


WordPress makes it incredibly easy for anyone to build a website. It’s backed by thousands of plugins and themes - even those with zero coding experience can get a functional site up and running quickly.
However, the out-of-the-box WordPress themes only offer limited styling options. Sure, they look good, but what if you want to achieve a truly unique, on-brand look for your business?
That's where custom CSS comes in. If you have a solid experience in CSS, you have unlimited power to customize every aspect of your site's design. From colors and typography to layouts and effects, you can easily craft a website that looks exactly how you envision it.
Plus, with the new Gutenberg editor, customizing your WordPress styles is more accessible than ever before.
In this article, we'll show you how to add custom CSS within Gutenberg blocks. With just a bit of CSS knowledge, you can transform your WordPress site from good to extraordinary and create a visually impressive online presence.
But First, What is CSS?
CSS stands for Cascading Style Sheets. It's a language used to control the appearance of web pages. It allows you to precisely define how different parts of your HTML should look, from basic elements like headings and paragraphs to complex components and layouts.
As you might know, HTML defines the raw structure and content of your page. But it's not enough on its own to display that content in an engaging way.
In the past, developers had to use inline styles within the HTML to change things like colors, fonts, and spacing. It was a long and painful process. It also made the code messy and hard to maintain.
CSS solves this problem by separating the styling from the HTML content. You write CSS rules that define how different HTML elements should be displayed. You have full control over colors, typography, spacing, and other design properties.
Best of all, CSS follows the DRY (Don't Repeat Yourself) principle. Once you define styles, you can reuse them anywhere that HTML element appears on your site.
For example, you don’t need to repeatedly add the same styling to a header or a footer. With CSS, the styling applies globally, wherever that particular element is placed. This keeps your code clean, consistent, and easy to maintain.
Why Add CSS to WordPress?
WordPress is designed to let anyone create a website without coding HTML, CSS, PHP, or JavaScript. This makes it great for simple sites like blogs or basic landing pages. For more sophisticated designs and functionality, WordPress provides numerous free and premium themes and plugins.
However, as your business grows, the standard styling options in themes and plugins will become too limited. You’ll likely need more customizations to create pages that match your unique branding and requirements.
Plus, relying solely on plugins brings potential downsides. Using too many can lead to conflicts between different plugins and themes. It can also bloat your site, making it slower and heavier to load.
So, the best solution? Add custom codes like CSS.
With custom CSS, you can:
- Take full control of your WordPress styling. Target specific elements with custom classes and code snippets. Override default styles effortlessly to nail your desired look and branding.
- Make your site responsive and optimized for every device. Use media queries to automatically adapt layouts and styling based on screen size, orientation, and resolution.
- Achieve 100% brand consistency across all pages and components. Maintain uniform colors, typography, spacing, and design details site-wide.
- Fix display issues cleanly without touching the original theme or plugin files. No more unintended conflicts.
- Delight users with visual flair like hover effects, animations, transitions, and stunning decorative flourishes. Enhance engagement and experience.
- Streamline for lightning-fast load times that boost performance. Techniques like CSS minification, concatenation, and preprocessors keep your stylesheets tight.
How to Add Custom CSS to WordPress
Below, we’ve laid out the different approaches to adding custom CSS to WordPress Gutenberg. Feel free to try each one to find the best method that suits your workflow preferences.
1) Using the WordPress Theme Customizer
The theme Customizer, first introduced in WordPress 3.4, is a useful feature that allows you to experiment with different designs without affecting your live site. This includes adding custom CSS styles.
One of the great things about the Customizer is the live preview. Here, you can view how your page will look before making any changes live.
To use the Customizer, go to Appearance > Customize from your WordPress dashboard.
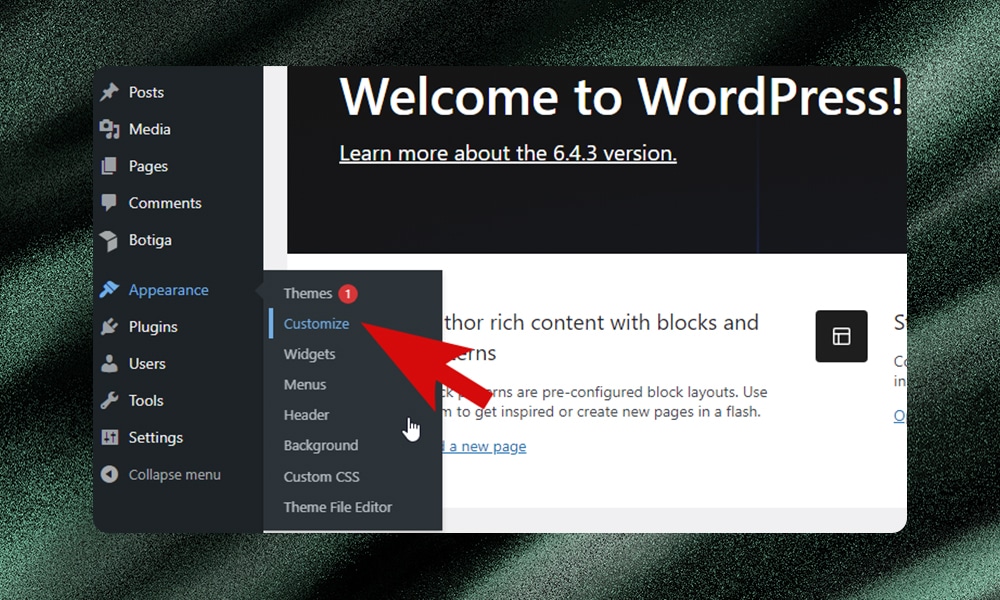
At the left side of the page, look for the ‘Additional CSS’ option. You should see it at the bottom of the menu.
Then, click on the ‘Additional CSS’ option to open the CSS editor. Add your custom CSS code directly into the editor box.
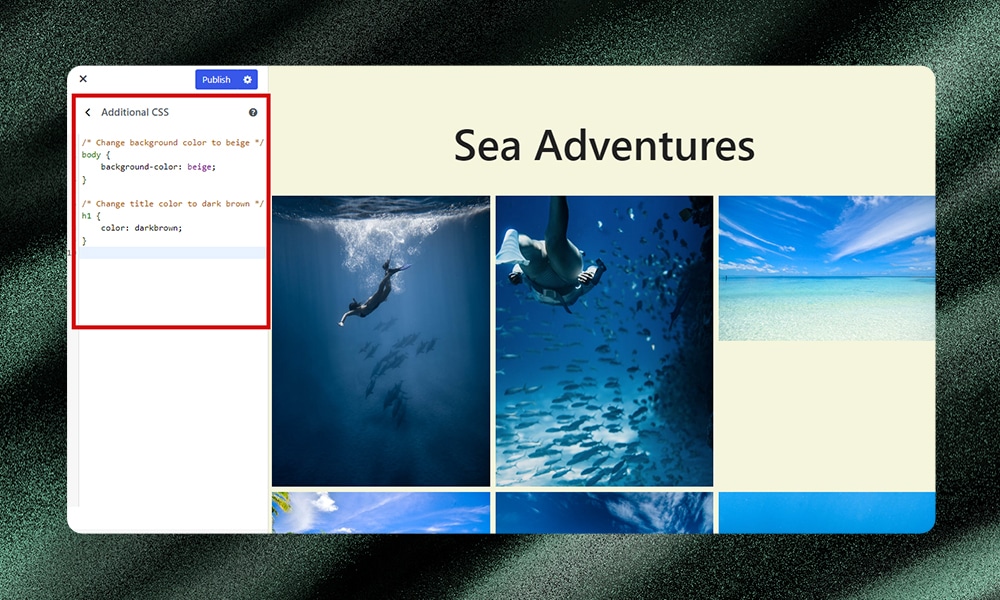
As you modify your CSS code, the live preview window will update. This window is located on the right-hand side of the Customizer. The best part is you can see the changes in real time - no need to refresh the page.
Take your time to review and tweak your custom CSS modifications. Once you're happy, click the 'Publish' button. This will save all your CSS changes and make them live on your website.
2) Using a CSS Plugin
WordPress has a lot of code snippet plugins to offer. For our purposes, we’re going to use the popular SiteOrigin CSS plugin.
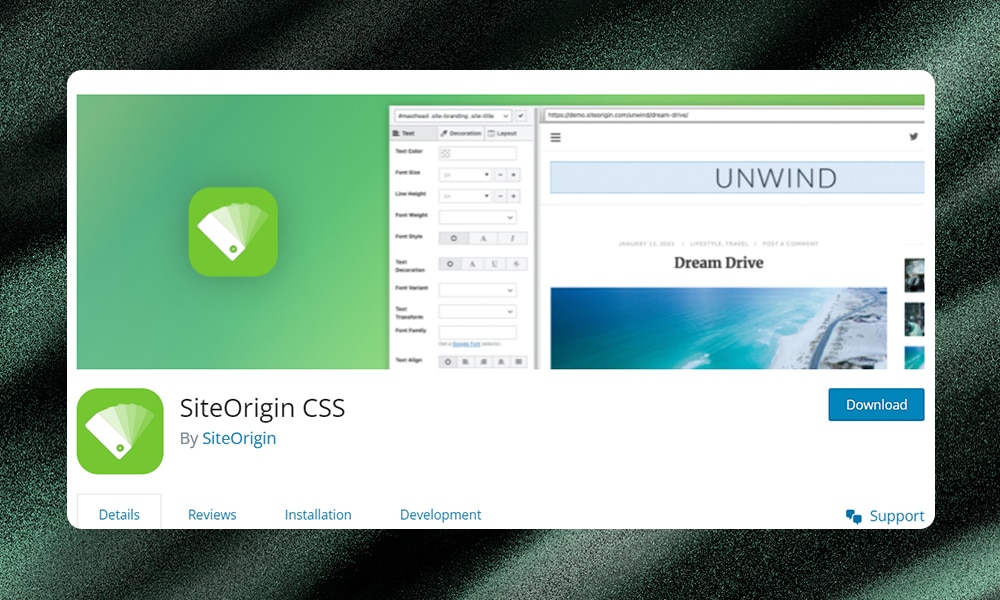
The SiteOrigin CSS plugin provides a dedicated editor that simplifies adding custom CSS code to your WordPress site. This makes it an ideal choice for beginners looking to modify their theme's appearance without dealing with code files directly.
To get started with SiteOrigin CSS, make sure the plugin is installed and activated on your WordPress site. From your admin dashboard, go to Plugins > Add New and search for ‘SiteOrigin CSS.’ Click ‘Install’ and then ‘Activate.’
Once activated, go to Appearance > Custom CSS. Here, you'll find a clean code editor interface where you can freely write and save your custom CSS styles.
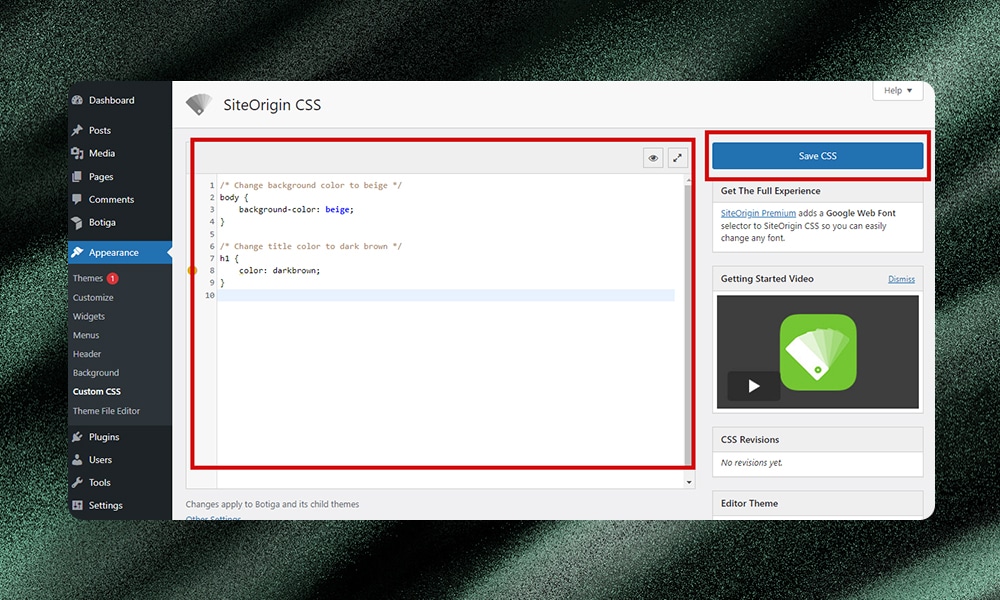
Finally, click the ‘Save CSS’ button to apply your changes. That’s it!
Now, check the frontend to see how the changes look. If needed, go back to the SiteOrigin CSS editor to make further adjustments or add more CSS rules.
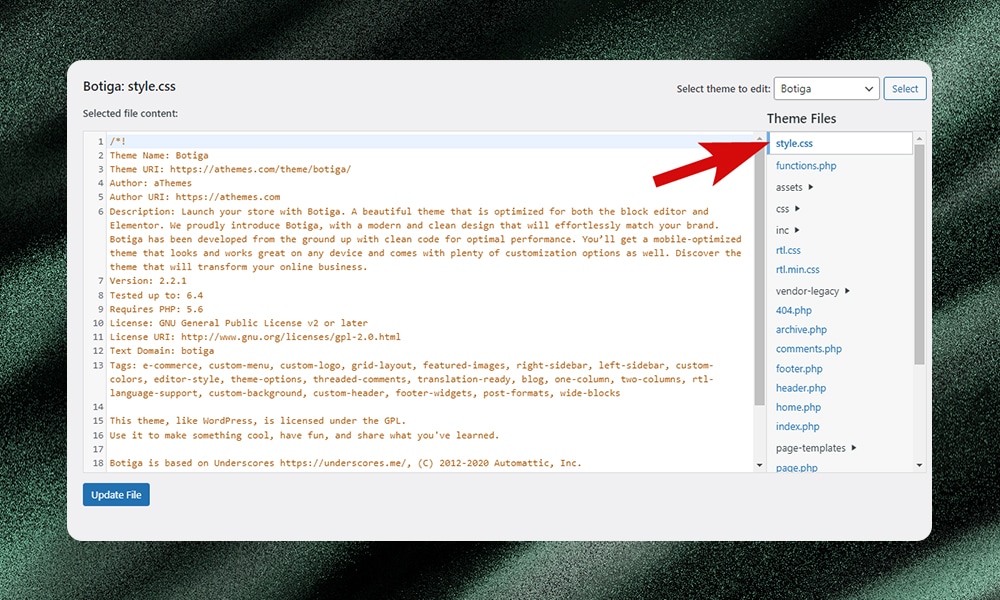
3) Editing Theme Files Directly
If you want full control and flexibility without relying on additional plugins or tools, you can add custom CSS codes directly to your theme files. However, this requires understanding WordPress file structure and how stylesheets get loaded. Otherwise, one mistake could easily break your site or make it inaccessible.
To get started, head to Appearance > Theme File Editor in your WordPress dashboard. Select the theme stylesheet, style.css, from the file list. Then simply add your custom CSS right into this file.
Alternatively, you can create a brand new stylesheet file and name it like my-style.css. Save it in a dedicated folder within your theme, for example, /css/my-style.css. Don't forget to properly enqueue this new file.
To enqueue, edit your theme's functions.php file, either through Appearance > Editor or by accessing /wp-content/themes/your-theme-name/ on your server. You can add something like this:
function enqueue_my_style() {
    wp_enqueue_style( 'my-style', get_stylesheet_directory_uri() . '/css/my-style.css', array(), '1.0' );
}
add_action( 'wp_enqueue_scripts', 'enqueue_my_style' );
Be sure to use a unique handle and update the file path to match your setup. Save changes, and you're all set!
Note: If you'll be customizing a lot, consider using a child theme instead of modifying core theme files directly. This way, your custom styles won't get overwritten when you update the parent theme in the future.
Custom CSS Common Issues and Fixes
Working with custom CSS can sometimes be tricky. Issues are bound to crop up which can quickly become a headache - from styles not displaying properly to layout inconsistencies and browser conflicts.
But don't worry, we've got you covered. Below, we've listed some of the most common custom CSS issues along with steps to troubleshoot and fix them.
1) Styles Not Being Displayed
If the styles aren’t showing up on the frontend after adding your custom CSS, then it might be caused by:
- Syntax errors in your CSS code
- Specificity conflicts with existing styles
- Incorrect targeting of elements
- CSS file not properly enqueued or included
- Caching issues
- Styles added in the wrong location
Here’s how to fix them:
- Check for syntax errors. Use a code editor with CSS linting or an online CSS validator to identify any missing semicolons, brackets, typos, etc in your code.
- Increase specificity. If your custom styles are being overridden, you may need to increase the specificity of your CSS selectors. As a last resort, you can use !important (sparingly) to override conflicting styles.
- Verify element targeting. Open your browser's developer tools and inspect the HTML structure. Make sure the CSS selectors you're using (e.g. classes, IDs) are correctly targeting the intended elements.
- Clear caching. Cached files can sometimes prevent your latest CSS changes from appearing. Try clearing your browser cache as well as any caching plugins or services you may be using.
- Enqueue or include CSS properly. Make sure you're adding your custom CSS in the right place. If using a plugin, double-check that you've enqueued or included the custom CSS file correctly following WordPress best practices.
2) Layout Appears Differently than Expected
Parts of your website's layout or design aren't displaying as intended. The possible reasons are:
- CSS syntax errors or invalid properties/values
- Lower specificity causing your styles to be overridden
- Caching preventing new CSS rules from being applied
To solve this issue, make sure to:
- Review your CSS. Carefully go through your custom CSS code and check for any syntax errors like missing semicolons or typos. Also, verify that all properties and values you're using are valid CSS.
- Check specificity. Open your browser's developer tools and inspect the elements that appear incorrect. Look for conflicting styles overriding your custom CSS and increase the specificity as needed.
- Clear all caches. Clear your browser cache as well as any caching plugins or caching services you're using for your WordPress site.
3) Responsive Design Issues
When custom CSS styles aren't responsive, it means the website layout doesn't adjust properly across different devices and screen sizes. This can lead to issues like overlapping elements, cut-off content, or a cramped, hard-to-navigate design on smaller screens.
The possible causes are:
- Lack of CSS media queries to adjust styles based on viewport width or device characteristics
- Incorrect use of relative units like percentages or ems
To fix this, here’s what you can do:
- Use CSS media queries. This will apply responsive styles based on viewport characteristics. For example, you can add this to your CSS:
@media screen and (max-width: 768px) { /* Mobile styles */ }- Use the Correct Relative Unit. You can define font sizes, padding, margins, etc. using percentages (%) or ems (em). Doing so will allow dimensions to adapt proportionally across screen sizes. Here’s an example of how to use them:
body {
    font-size: 16px; /* Base font size */
}

h1 {
    font-size: 2em; /* Font size will be twice the base font size (32px) */
}
4) Changes Lost After Theme or Plugin Updates
After updating your WordPress theme or plugins, any custom CSS modifications you've made can get overwritten and lost. This happens when you add custom CSS directly to theme or plugin files.
Here’s the quick fix:
- Use a child theme. This isolates your changes from the parent theme's files. Any theme updates won't overwrite styles in the child theme.
- Use a Custom CSS plugin. Another way is to install a plugin dedicated to adding custom CSS code. Here, your styles live independently from theme/plugin files. Updates won't impact CSS added through the plugin.
5) Browser Compatibility Issues
Browsers can sometimes interpret your CSS codes differently. When this happens, your web pages might display unexpected layout issues, formatting problems, or styling inconsistencies across different browsers.
The possible causes are:
- Missing vendor prefixes
- Using deprecated CSS
- Browser bugs in handling certain styling techniques
Here are ways to fix this issue:
- Use vendor prefixes. Add vendor prefixes for newer CSS properties to ensure cross-browser support. Example: -webkit-, -moz-, -ms-, -o-
- Follow standards. Stick to well-supported, standards-compliant CSS to minimize compatibility risks.
- Test rigorously. Make sure to test your custom CSS across all major browsers and versions during development.
WordPress Gutenberg Custom CSS - FAQs
How do I add custom CSS to WordPress Gutenberg?
There are many ways to add custom CSS codes to WordPress. In this article we’ve mentioned three methods - via the WordPress theme Customizer, using a CSS plugin, or directly editing the stylesheet file in a child theme.
How do I add a CSS class to the Gutenberg block?
To add a CSS class to a Gutenberg block, simply select the block, click on the ‘Advanced’ dropdown, and enter your desired CSS class in the ‘Additional CSS Class(es)’ field.
How do I link CSS styles in WordPress?
To link custom CSS styles in WordPress, you can either enqueue stylesheets within your theme's functions.php file or directly add CSS code snippets through the ‘Additional CSS’ section of the WordPress Customizer.
Wrapping It Up
You don’t need to settle for a generic-looking website. If you know a little CSS, then tailoring your website to match your vision is completely achievable.
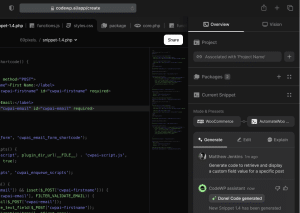
And if you want to accelerate your workflow, check out CodeWP. This AI-driven platform is built specifically for WordPress. All you need to do is describe your requirements - the AI will then transform them into optimized CSS codes.
With the right method and tools, you’re now ready to style your WordPress site like a pro!