
OpenAI’s powerful capabilities open up a lot of opportunities for WordPress users.
For instance, if you’re struggling with creating fresh content, AI offers a solution without the need for endless brainstorming sessions.
Need to optimize your content? AI can help with that, too. Plus, OpenAI is not limited to text. You can also use it to generate beautiful images for your site’s cover photos, featured images, product images, and many others.
But how do we do that?
In this article, we'll show you how to use OpenAI in WordPress. So, keep reading to find out more!
What is OpenAI?
OpenAI is an AI research company known for developing cutting-edge AI algorithms that benefit humanity.
A lot of people tend to mix up OpenAI and ChatGPT. However, they’re not the same! ChatGPT is just one of the products developed by OpenAI. And they've got a whole suite of impressive AI tools, too, like DALL-E for generating images.
Signing up for an OpenAI account is free. When you first sign up, they'll give you $5 worth of free ‘tokens’ that you can use to play around with their language models. After that, you'll need to pay per token you use, but the prices aren't too crazy. You may check out their website to get an actual computation per model.
Here's where it gets really exciting - you can actually use OpenAI on your WordPress website. There are a couple of different ways to do it.
The easiest route is to use one of the handy WordPress plugins that integrates OpenAI. Just install the plugin and add your OpenAI API key to start generating AI-powered content and images.
But if you're feeling a little more adventurous, you can also build your own custom integrations. This involves diving a bit deeper and writing your own custom scripts. It does require a bit more technical know-how. But the extra effort is worth it - you can harness OpenAI’s full capabilities in a way that's uniquely suited to your WordPress website.
Creative Ways to Use OpenAI in WordPress Website
There are countless ways you can use OpenAI to enhance your WordPress website. Here, we’re going to show you how to do it via WordPress plugins.
But first, you’ll need to generate an OpenAI API key.
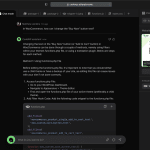
If you don’t have an OpenAI account, make sure to create one. Visit the OpenAI Platform sign-up page, fill in your personal details, and agree to the terms of service.
Once your account is activated, log in to the OpenAI Platform, and navigate to the API Keys tab. Click on ‘Create an API key,’ give it a descriptive name, and click ‘Create.’ Your unique OpenAI API key will then be generated and shown in the API Keys section. All you need to do is copy and paste it into your plugin’s settings.
Note: The API key will only be visible once. So, make sure to copy it and save it in a safe location.
Now, let’s get down to business.
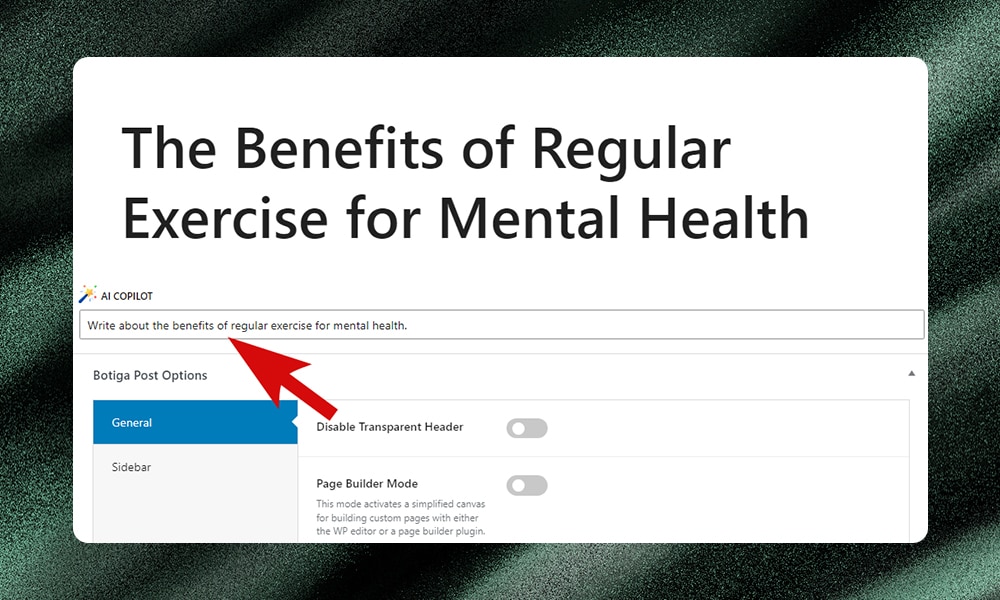
1) Generate Content for Blog Posts
Staring at a blank screen, struggling to find the right words - we've all been there. But with AI, you can quickly overcome that dreaded writer's block.
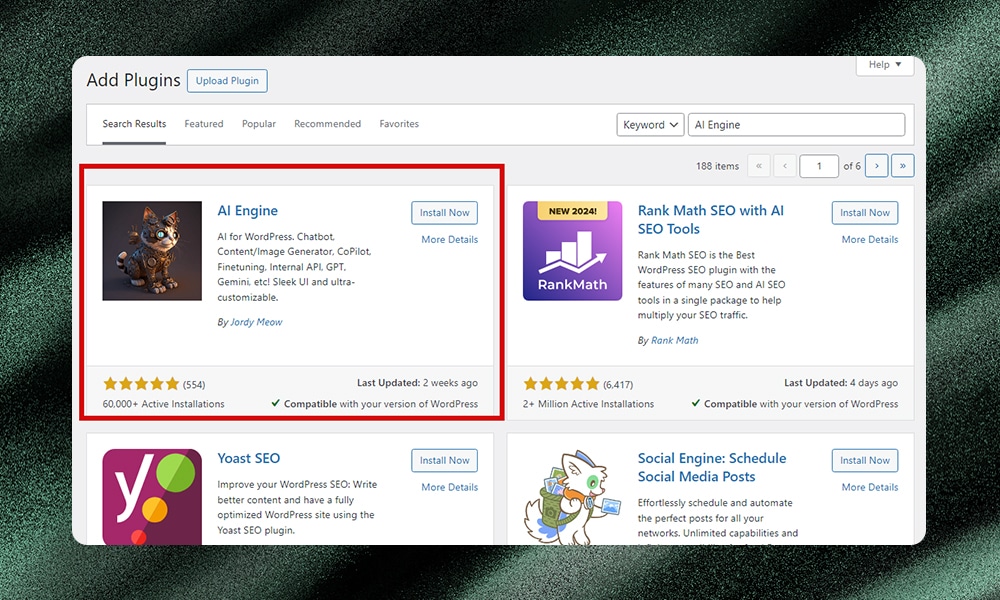
One of the best AI plugins for WordPress to generate content is AI Engine.
AI Engine makes it easy to leverage OpenAI's capabilities within a WordPress website. It includes features like AI-generated content, grammar correction, SEO optimization, and bulk content creation. Beyond blog posts, the plugin also includes a ChatGPT-style chatbot and smart form builders to enhance user engagement and conversions.
AI Engine offers a free version for you to experiment with. For the premium version, their pricing scales from individual sites ($49/year) to agency-level plans (up to $899) to accommodate a range of needs.
How to set up and use AI Engine:
To get started with AI Engine, you'll first need to make sure the plugin is installed and activated on your WordPress site.
Next, you'll need to connect AI Engine to your OpenAI account. From your WordPress dashboard, go to Meow Apps > AI Engine and locate the API Key field under the settings tab. You can either manually enter your OpenAI API key here, or click the provided link to log into your OpenAI account and generate a new key.
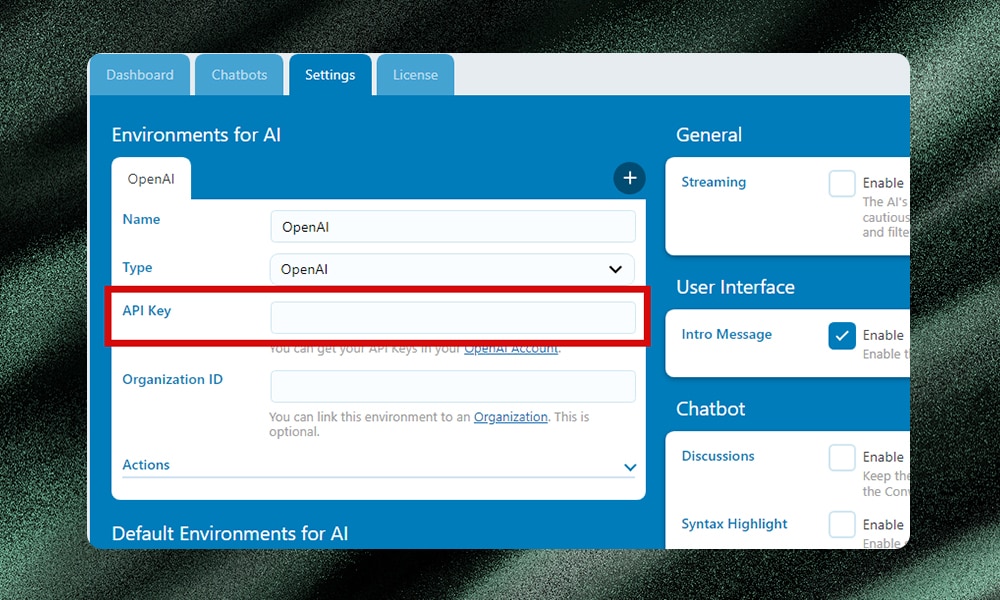
Once you've saved the API key, AI Engine will be ready to use. You'll find its features integrated directly into the WordPress Gutenberg editor. When creating a new post or page, simply look for the AI Engine tools, which allow you to generate title ideas, article outlines, and full content pieces using OpenAI's language models.
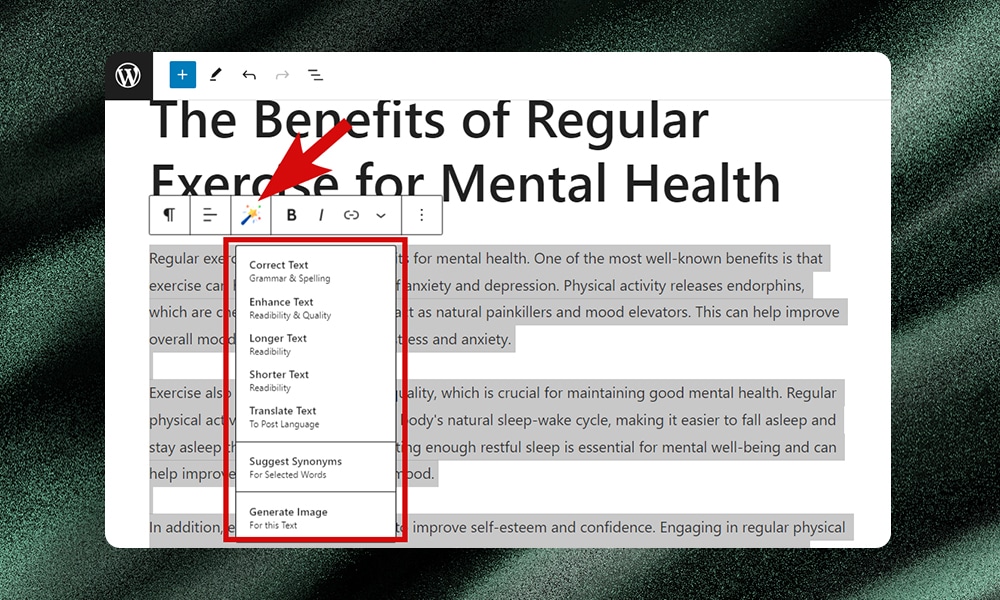
To summon the AI assistant writer, simply press the space bar on your keyboard. Note that you might need to reiterate several times until you land on the perfect tone and wording for your needs.
You can also access text enhancement tools like grammar correction, length adjustment, and translation.
2) Optimize Content for SEO
SEO is extremely important for any website. But manually optimizing all that content requires hours of your precious time. Why not automate it with AI?
By tapping into OpenAI’s capabilities, you can analyze keywords, structure, and readability to optimize your content effortlessly for search engines. You can even add meta descriptions, generate keyword suggestions, and many more.
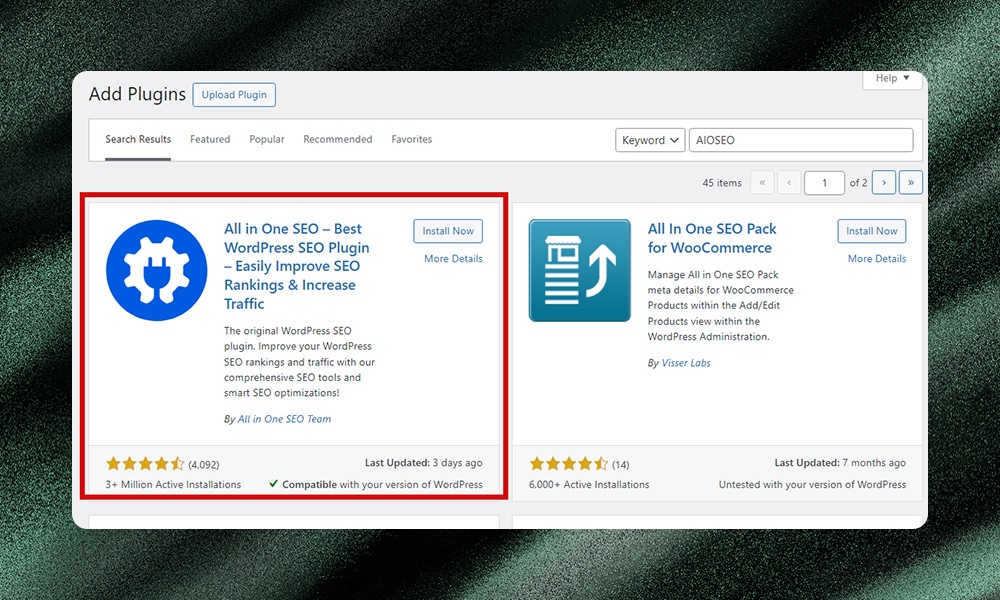
One of the best WordPress plugins for SEO is AIOSEO.
AIOSEO, or All in One SEO, is packed with features to streamline your site's optimization. From real-time content analysis to rich snippet creation, AIOSEO handles all the heavy lifting so you can focus on creating great content.
Now, with OpenAI under the hood, you can generate perfectly optimized meta descriptions and discover valuable keyword ideas. Your posts and pages are structured in a way that search engines love.
How to set up and use AIOSEO:
Make sure that AIOSEO is installed and activated. Once that's done, you'll see a new menu item in your WordPress dashboard labeled ‘All in One SEO.’ Go ahead and click on that to access the plugin's settings.
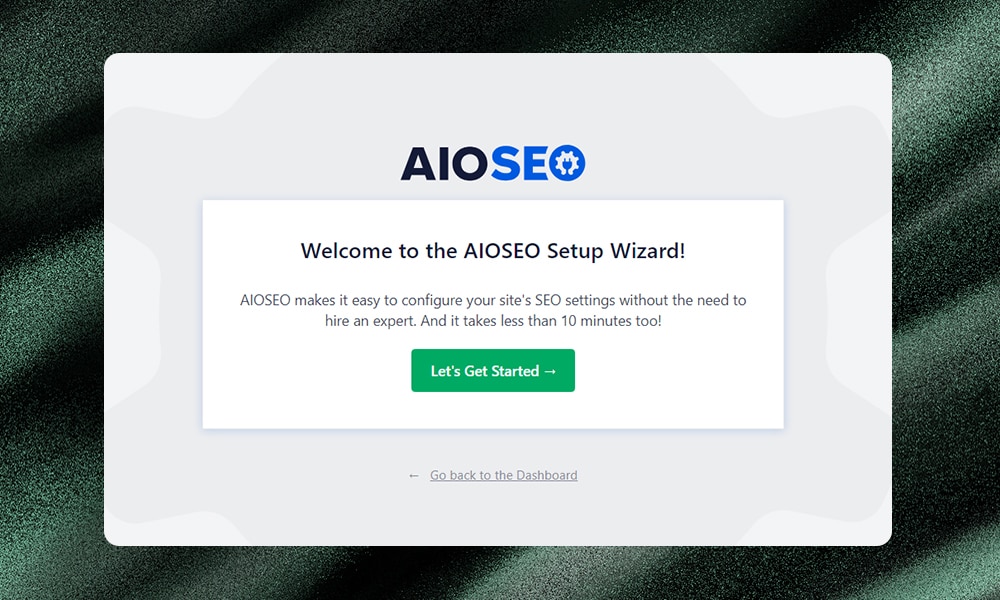
A setup wizard will guide you through configuring the basic SEO parameters for your site. This includes your title format, default meta descriptions, and whether you're representing an individual or a business. Be sure to follow all the steps carefully.
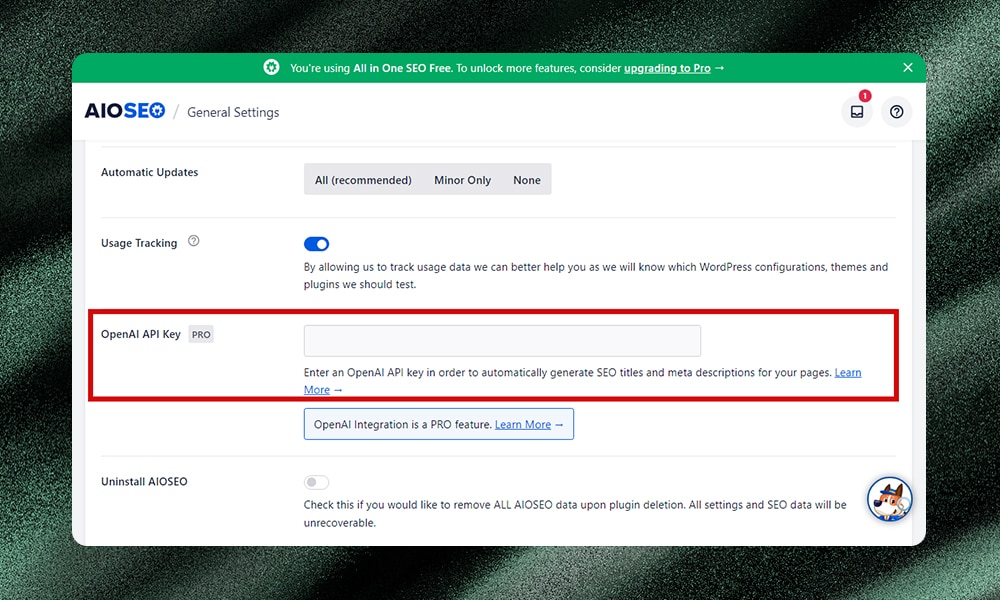
AIOSEO offers a free version but with limited features. To unlock the plugin's full potential, you'll want to upgrade to one of the Pro plans. This gives you access to advanced tools like the OpenAI integration we're about to set up.
Once you've got your license key, go to the plugin’s general settings and click on the ‘Advanced’ tab. This is where you'll find the field to paste in your OpenAI API key. Go ahead and do that, then save your changes.
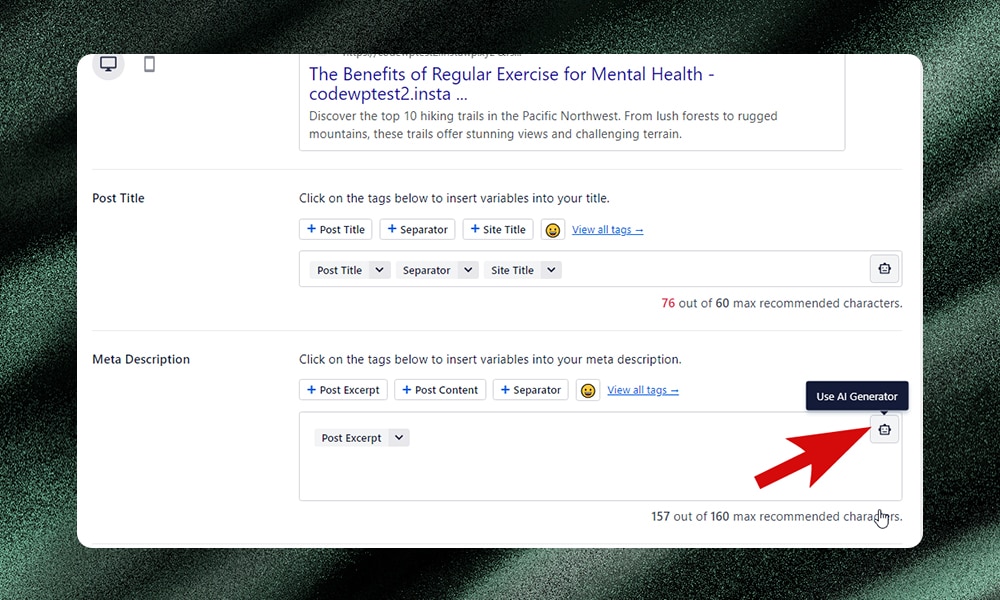
Now that you've got AIOSEO all set up and connected to OpenAI, go ahead and open a post or page you want to optimize. You should find the AIOSEO settings at the bottom of the editor. You can start tweaking things like the SERP preview, post title, and meta description. Just click on the AI icon within any of those text fields, and AIOSEO will get to work generating SEO-optimized suggestions for you.
You can also preview exactly how your content will appear in search engine results, complete with rich snippet formatting. This allows you to fine-tune things like your schema markup and social media optimization to ensure maximum visibility and appeal.
3) Write Product Descriptions
If you’ve got hundreds or even thousands of products, would you be willing to spend hours and hours writing product descriptions for each and every one of them? Probably not. The good thing is you can let the AI do the job. They’re practically built for tasks like this - they can mass-produce unique, engaging, and conversion-focused product copies in a few clicks.
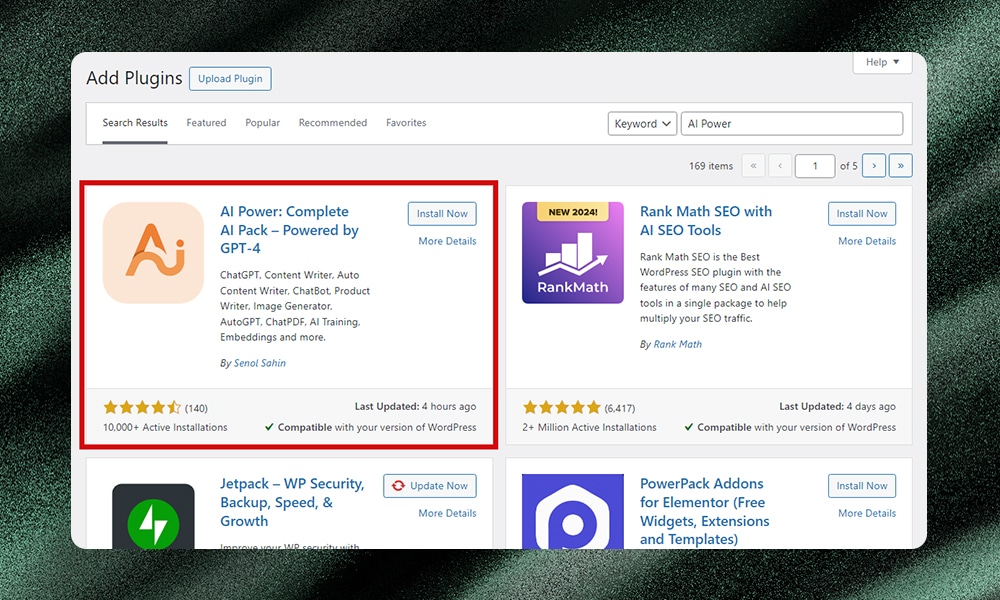
That’s where AI plugins like AI Power step in.
AI Power simplifies content management with its intuitive user interface. Its features include a form generator, DALL-E and Stable Diffusion-powered image creation, and on-demand content tools. If you’re building a WooCommerce store, this plugin can help you generate product descriptions and recommendations to drive sales. It can also do other tasks like bulk content creation, SEO optimization, and FAQ building.
How to set up and use AI Power:
Make sure that WooCommerce and AI Power plugins are properly installed and activated on your WordPress website.
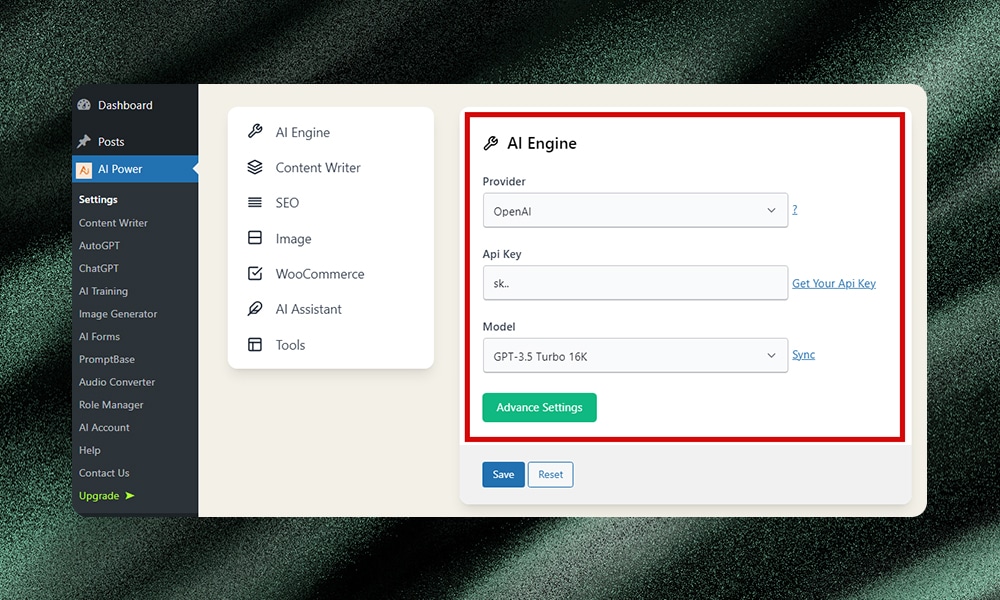
Then, go to the plugin’s settings. Under the AI Engine tab, paste your API key on the designated field, and click ‘Save.’
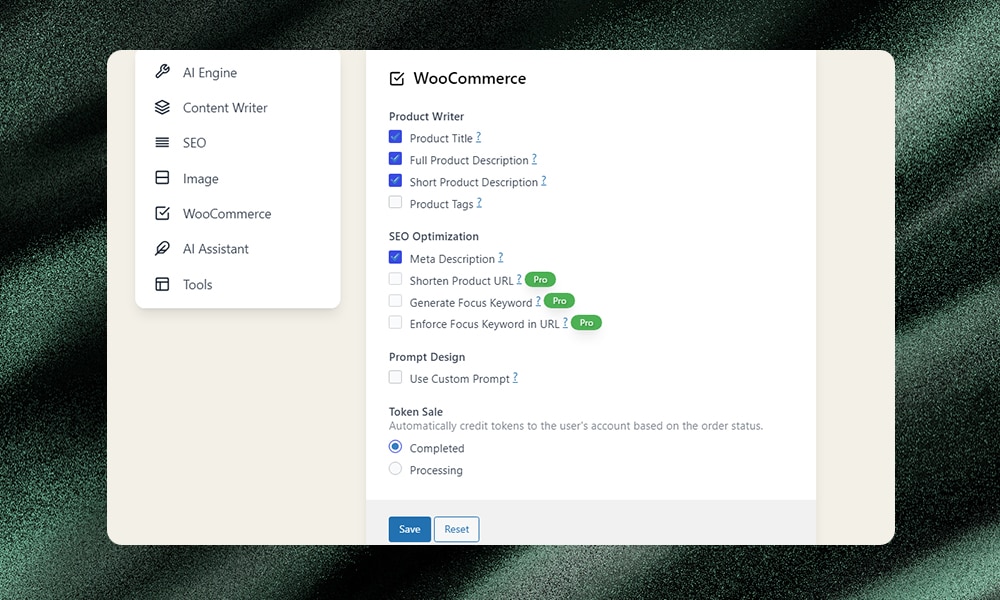
Next, go to the WooCommerce section and select the features you wish to use. For example, if you want AI Power to generate a product title and full product description, make sure that these boxes are checked.
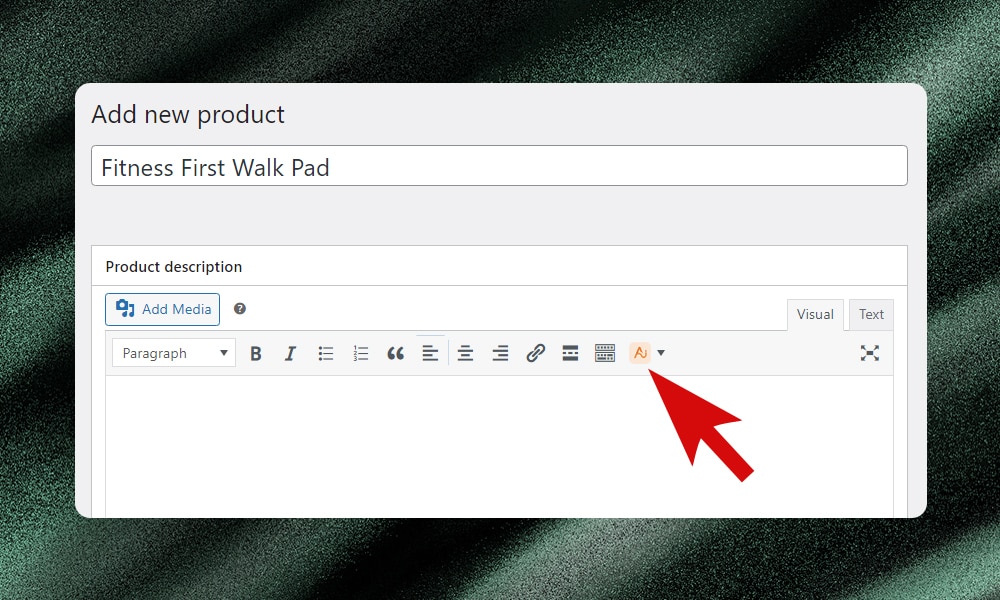
After saving these settings, you can begin adding new products to your store. On the left side menu, go to Products > Add New Product. Then, enter the name of your product.
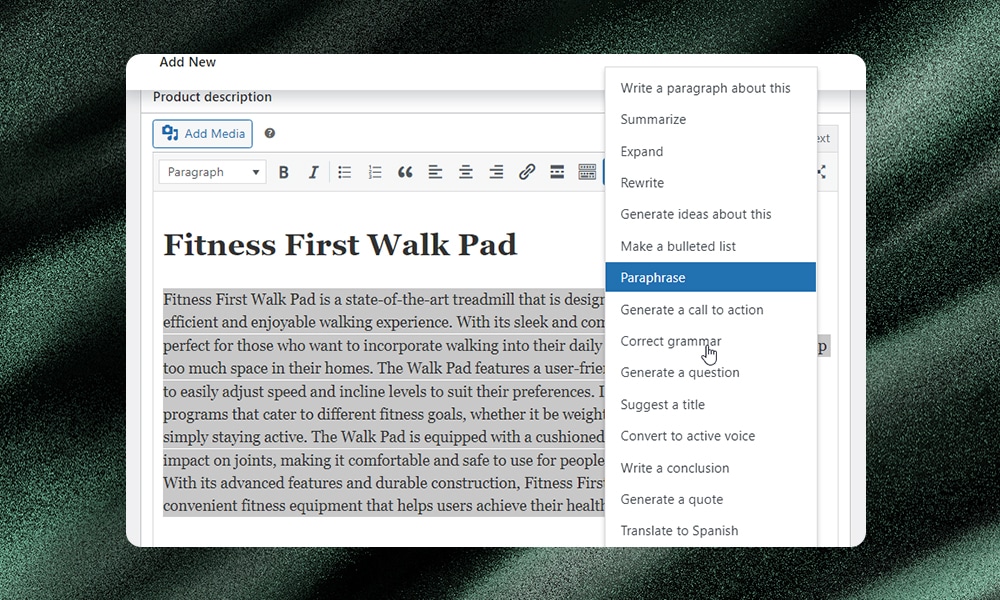
Scroll down to the 'Product description' section. Click on the AI Power icon to generate content through various options like paragraph creation, summarization, and rewriting.
Review the generated content. Make any necessary adjustments to align the tone and style with your brand. Finally, save and publish the updated product listing.
4) Automate Website Localization
Localization makes your website feel like home to every visitor, regardless of where they're from. However, translating every page can be a painstaking and time-consuming task.
With AI, you can automate this process to save time and resources.
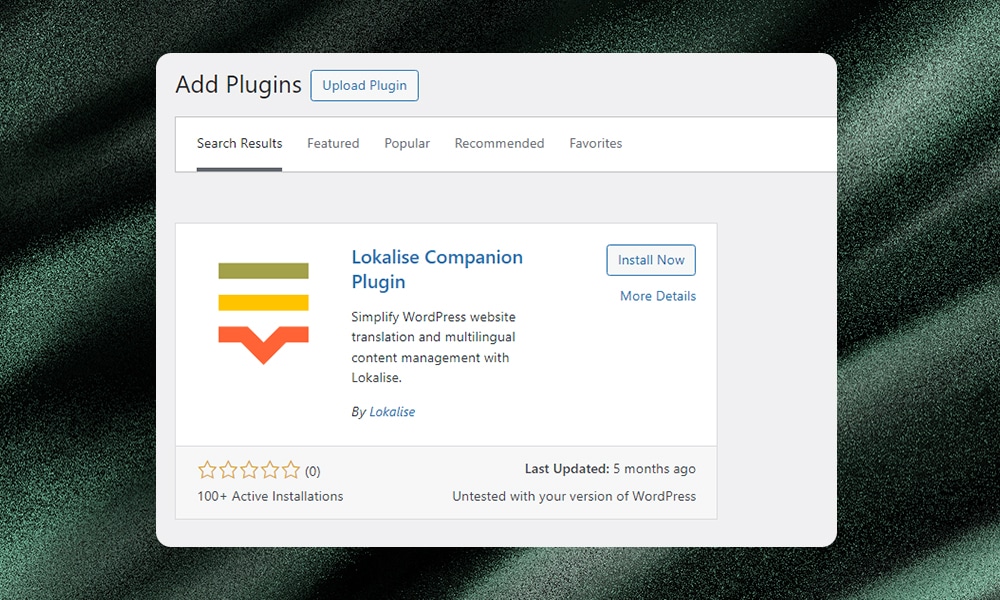
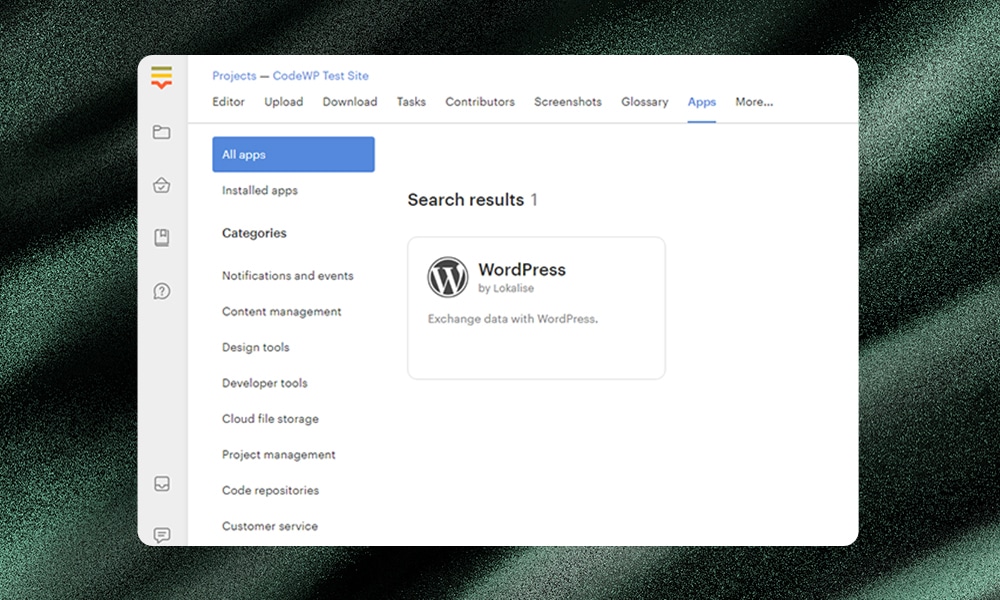
One of the best tools for this task is Lokalise.
Lokalise is a cloud-based platform that can help you automate and manage the whole localization process. Its AI translation assistant, Lokalise AI, connects to OpenAI via an API to translate your content accurately.
What's really great about Lokalise is that it’s designed to work well with different apps, including WordPress. There’s also a plugin available to connect with your Lokalise account.
How to set up and use Lokalise:
To set up and start using Lokalise on your WordPress site, you’ll need to install and activate the plugin first. Simply search for ‘Lokalise’ from the plugin directory.
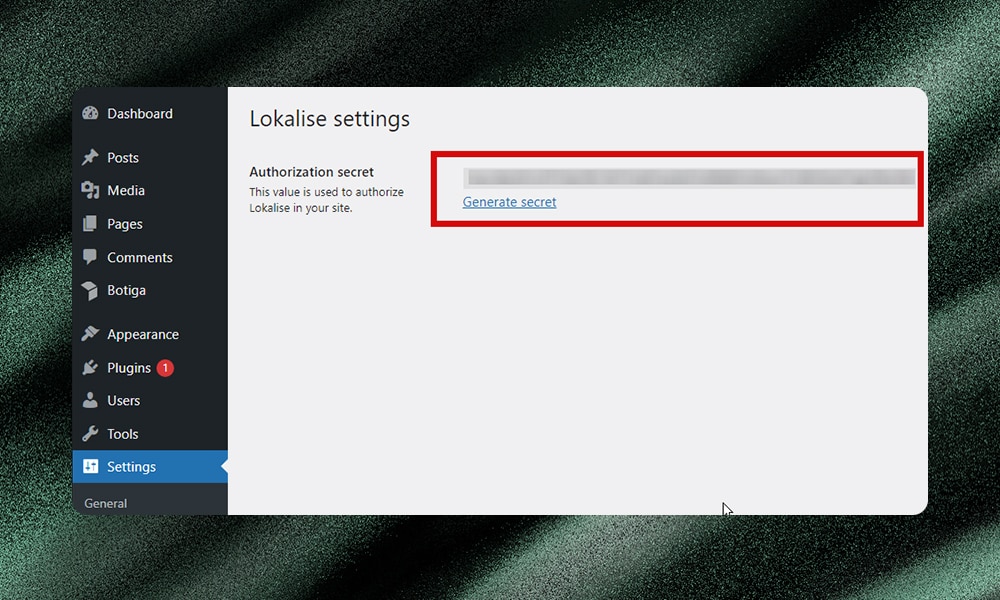
Note that you'll also need to have either the WPML or Polylang plugin installed and activated to fully utilize Lokalise's functionality.
Once the plugin is active, go to Settings > Lokalise in your WordPress admin area. Then, copy the authorization secret key. You’ll need this later on when you configure your project in the Lokalise platform.
Now, log in to your Lokalise account. Under apps, search and install WordPress.
You will then be asked to authorize the connection between your WordPress site and your Lokalise account. Follow the on-screen instructions to complete the authorization process. Enter your WordPress site URL and the Lokalise secret key.
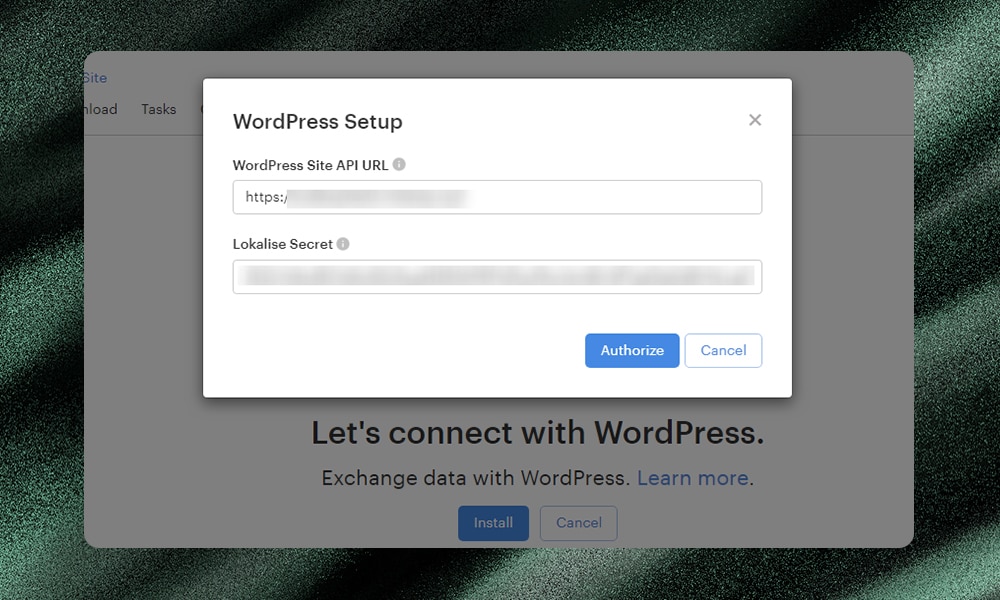
Note: When entering your website URL, make sure to add ‘/wp-json’ at the end. For example, your site URL should look like this: https://mysite.com/wp-json
Then, configure some settings within the Lokalise plugin. You can create a new project or select an existing one you want to work on. You may also specify your translation preferences.
With Lokalise integrated with your WordPress, you can begin translating your website content. Lokalise provides a user-friendly interface for managing translations, collaborating with team members, and using its AI-assisted translation features.
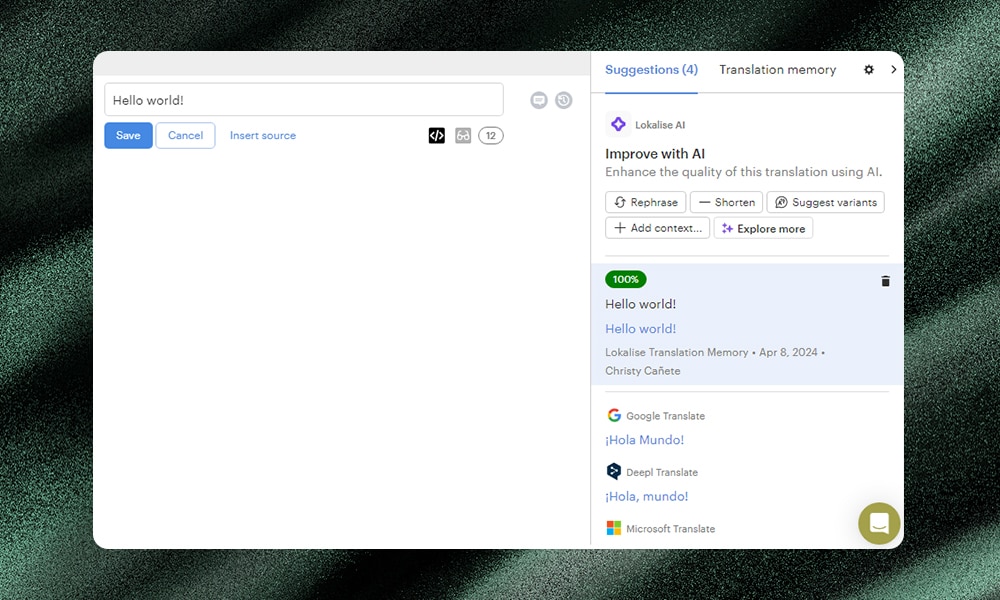
Click on the content you want to translate. You should access the Localise AI section on the right side. After completing translations, you can publish them directly from Lokalise to your WordPress website. To learn more about using Lokalise's AI features, please refer to this tutorial.
5) Generate Images
High-quality images are an absolute must for any successful WordPress website. If you can’t afford a graphic designer or you simply don’t have the artistic talent to create one, you can outsource the task to an AI assistant.
Not only can you use AI to generate images for blog posts but also for your product images, social media posts, cover images, banners, logos, and more.
Plus, most AI tools allow for customization to ensure images are aligned with your specific content or branding needs. With AI, it’s also easier to generate large volumes of images quickly.
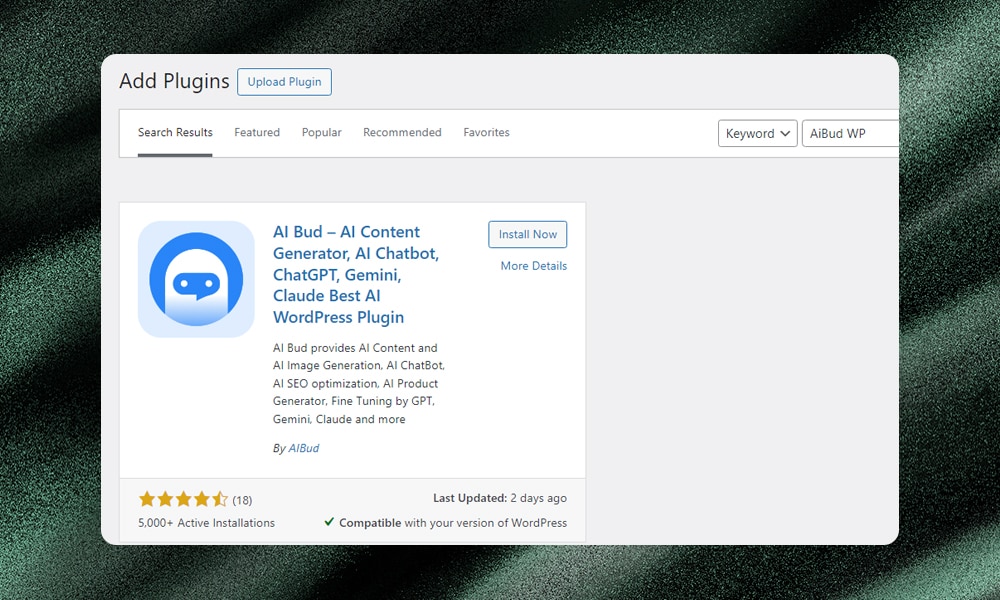
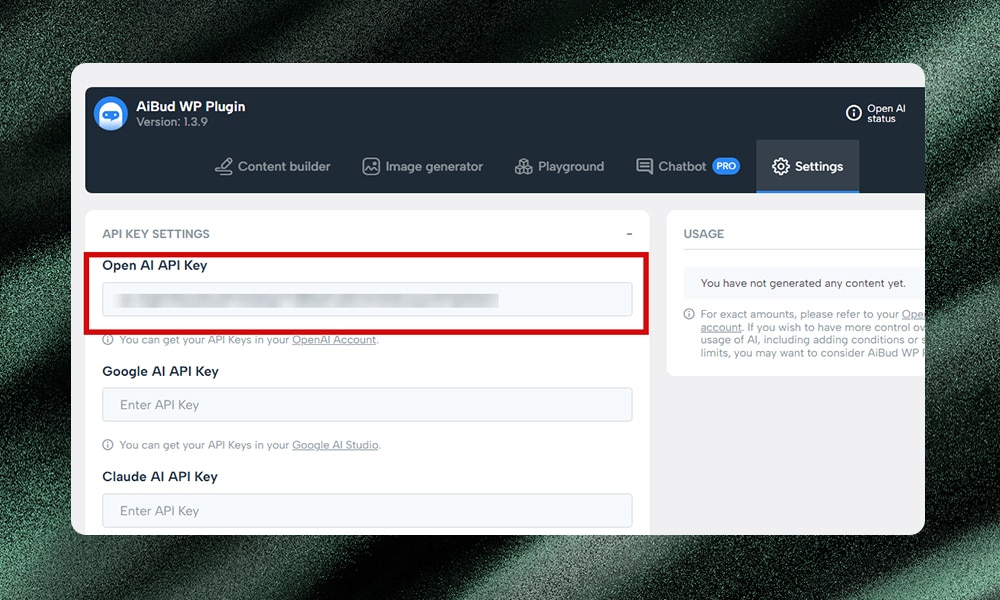
We’ve written a separate article about the best AI plugins to generate images. Go ahead and check this out! One plugin we especially recommend is AI Bud WP.
AI Bud WP is a WordPress plugin powered by GPT-4, DaVinci, and DALL-E to generate not just stunning visuals but also high-quality content. Its standout features include a Bulk Content Builder, a chatbot feature, and a WooCommerce product auto-description generator. If you’re looking for a comprehensive solution to boost your online presence, this plugin is worth trying out.
How to set up and use AI Bud WP:
To get started, you should have AI Bud WP installed and activated on your WordPress.
From your WordPress dashboard, go to the plugin’s settings page. Then, paste your OpenAI API key into the designated field.
Now, you’re ready to generate images. Let’s say you want to add a cover image for your blog post. Just open that post in the Gutenberg editor and, under the AI Bud WP panel on the right, click ‘Generate Image.’
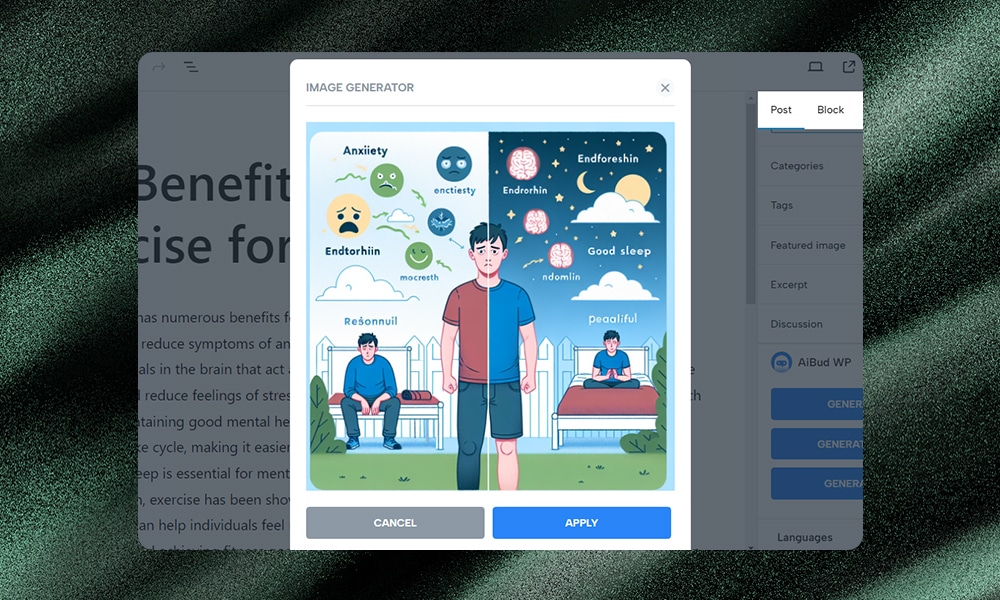
It will then generate an image based on your article topic. Once you’re satisfied, click ‘Apply’ and then ‘Done.’ Then, save your work to update the post. That’s it!
6) Engage Visitors with an AI Chatbot
One of AI’s capabilities is to interact with website visitors in real-time. So, why not use this technology to free up more time, or help your agents focus on higher-impact tasks?
AI-powered chatbots can help you answer queries, promote products, or even provide support while learning from each interaction. All of these are made possible by the sophisticated algorithms that drive these intelligent assistants.
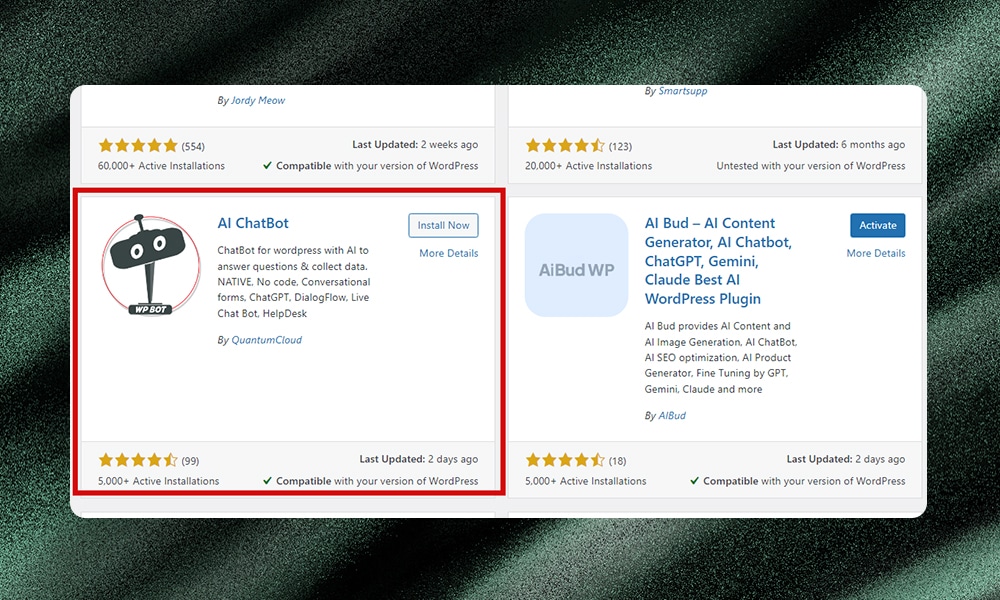
AI ChatBot by QuantomCloud is one of the best plugins that offer native integration without any coding required. It functions as a conversational interface to answer user inquiries and collect information via conversational forms.
It also supports multiple language modes and can be powered by DialogFlow, Tavily, or OpenAI ChatGPT. Its features include natural language processing, button-driven menus, and integration with Google's Dialogflow and Tavily Search API. With the premium version, users can access advanced capabilities like retargeting, integration with third-party platforms, and OpenAI GPT3 fine-tuning.
If you need more chatbot plugin options, we’ve made a separate review of the best WordPress live chat plugins. Make sure to check this out.
How to set up and use AI ChatBot:
First, install and activate the WPBot plugin on your WordPress website. You can search for it in the WordPress plugin directory or upload it manually.
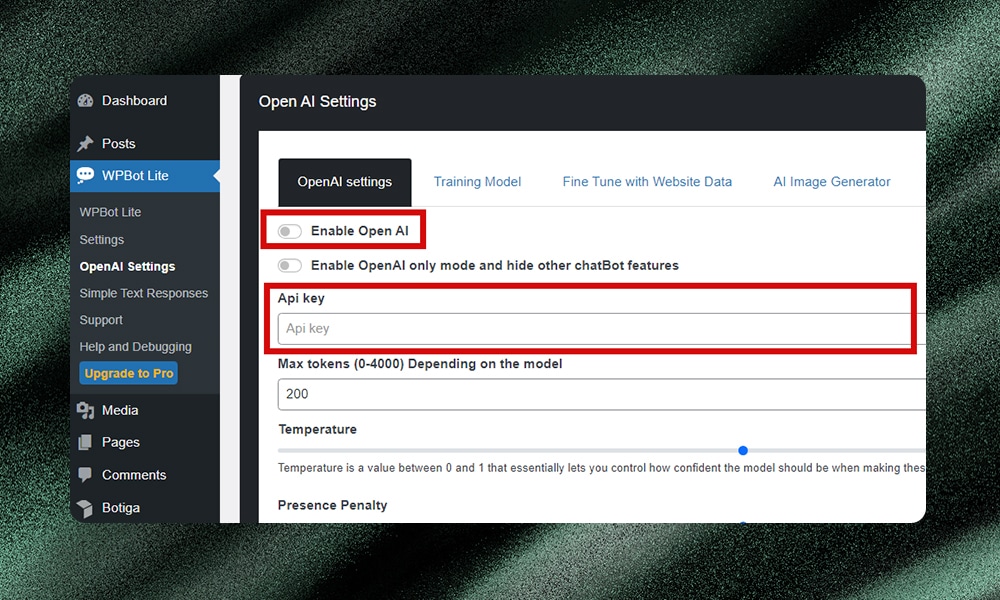
Next, go to WPBot Lite > OpenAI Settings. In the OpenAI integration section, paste your OpenAI API key into the designated field. Save the changes.
Once you've added your API key, enable the OpenAI integration within the WPBot settings. This will activate the plugin's ability to use OpenAI's capabilities.
Depending on your specific need, you may want to adjust additional settings related to the OpenAI integration. Take a moment to review and configure these settings accordingly. Then, hit save.
After setting it up, test the WPBot chatbot on your live website to ensure it's working as expected. Interact with the chatbot and see how it responds to user queries and requests.
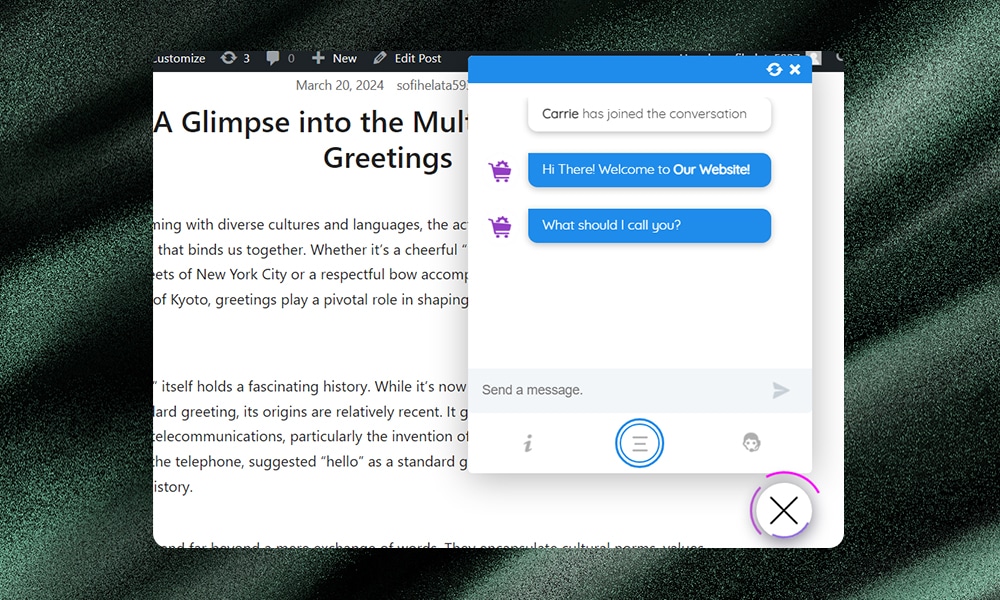
7) Integrate AI in Contact Forms
Contact forms are important for connecting with your website visitors and customers. But let's be honest - the generic, one-size-fits-all approach often lacks the personal touch.
With AI, you can easily personalize responses on contact forms in WordPress. Firstly, you can tailor responses based on individual queries or input. This creates a more engaging and user-friendly experience. Most importantly, AI can analyze and categorize incoming messages, so that the appropriate department or team member can receive the message.
Everest Forms is one of the many form builders for WordPress. It’s beginner-friendly, thanks to its drag-and-drop feature. You can use this to easily create order forms, contact forms, surveys, and more. With its AI features, it gets even easier.
How to set up and use Everest Forms:
First, install and activate the Everest Forms plugin on your WordPress website. You can download it for free or purchase the premium version based on your needs.
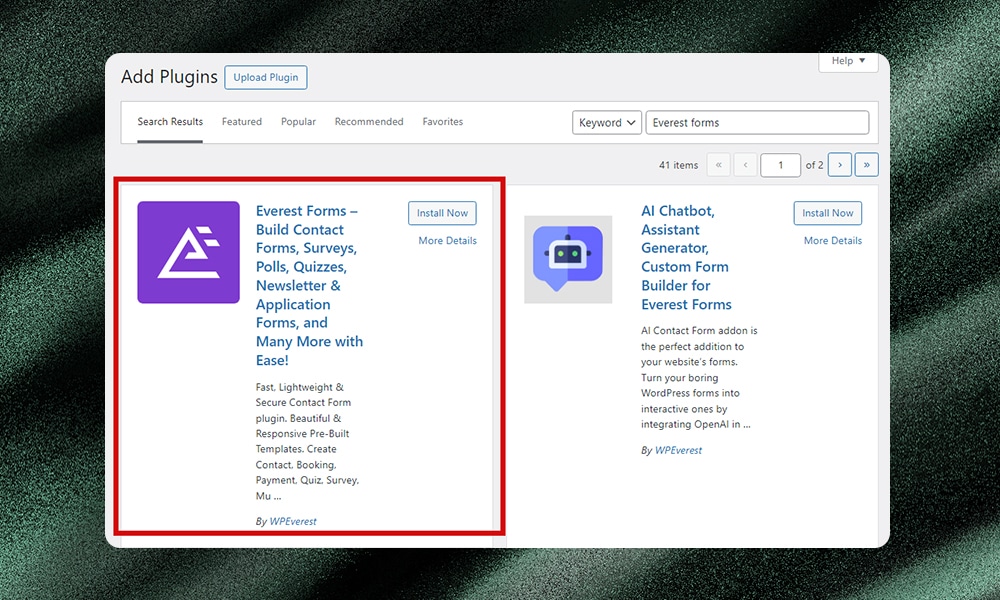
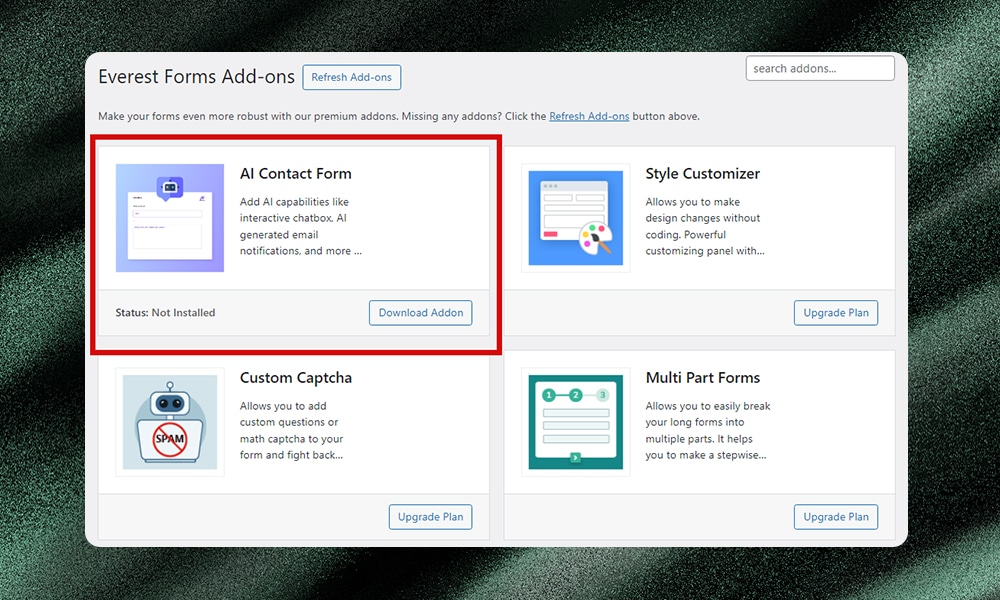
Next, install and set up the AI Contact Form addon. Navigate to Everest Forms > Add-ons in your WordPress admin dashboard. Download and upload the addon file, then activate it. Note that you can also download the plugin manually from Github.
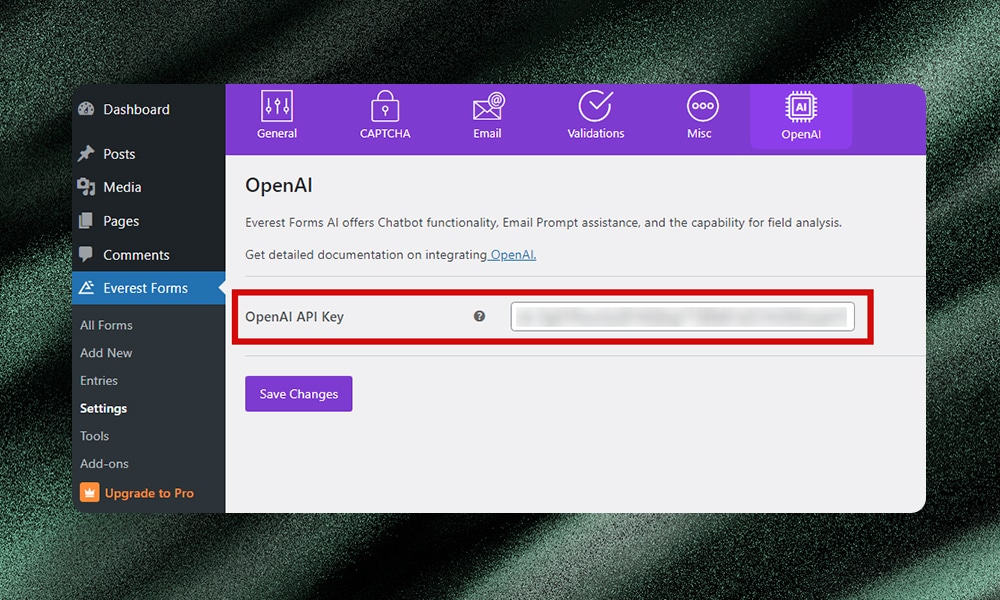
Once the addon is activated, go to Everest Forms > Settings. Click the OpenAI tab. Then, paste your OpenAI API key into the designated field. Save the changes.
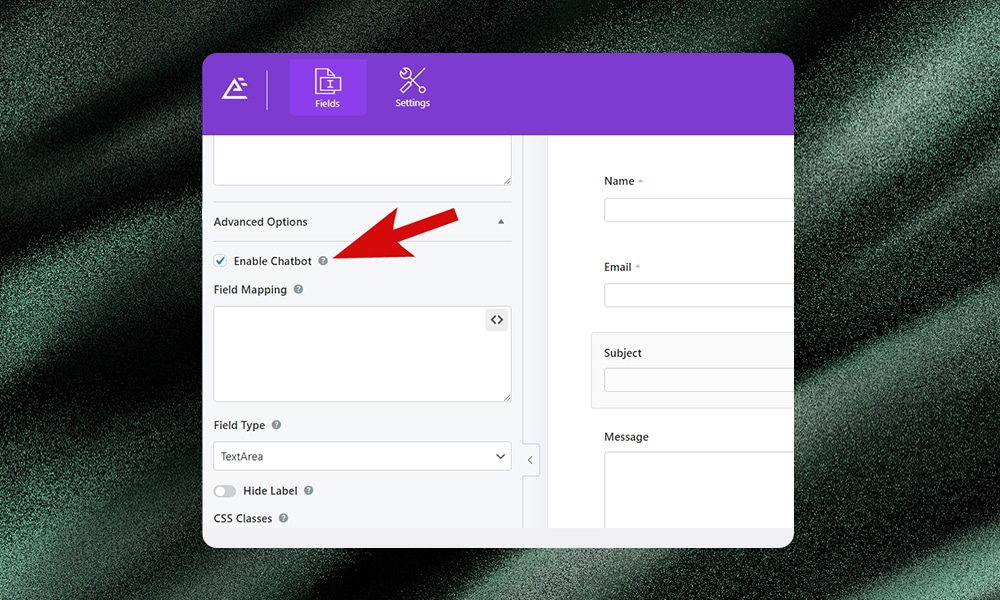
Now, you can create a new form or customize an existing one. From the form builder, go ahead and add the AI field. Click ‘Field Options,’ and, under the ‘Advanced Options’ tab, configure it to enable the chatbot feature and automated email notifications. Optionally, you can set prompts to analyze user responses.
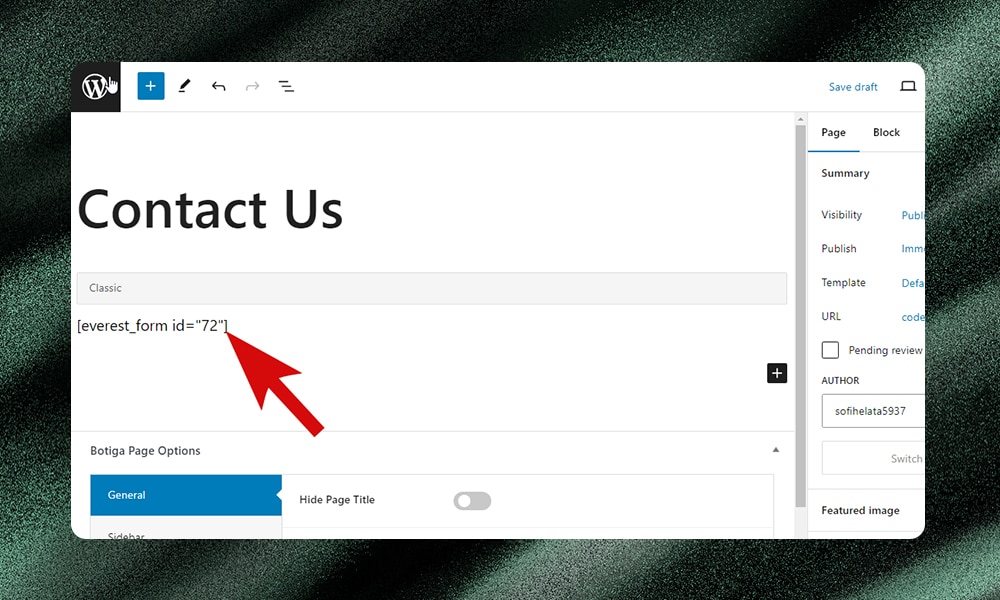
Finally, publish the form on your website by using either the Everest Forms block or shortcode.
Using OpenAI in WordPress - FAQs
Is OpenAI free?
When creating a new OpenAI account, you are given a $5 worth of free tokens which allows you to make unlimited API requests and access a smaller selection of OpenAI API models. Once you’ve used up your free credits, you’ll be charged at a rate based on the amount of data you’re using.
How do I add OpenAI to my website?
To add OpenAI to your website, you can either add an API directly into your website's code or use WordPress plugins that offer pre-built integration options.
How do I integrate an AI chatbot in WordPress?
You can integrate an AI chatbot into your WordPress site in various ways. The most common and easiest is to install a dedicated plugin. Note that some plugins might require an API key which you can purchase from platforms like OpenAI.
There You Have It!
Adding OpenAI to your WordPress website opens up a lot of possibilities. You can use it to make your content better, improve how your site shows up in search engines, connect with your audience, and more.
We’re pretty sure that AI will continue to disrupt the WordPress community, and it’s clear we need to embrace it.
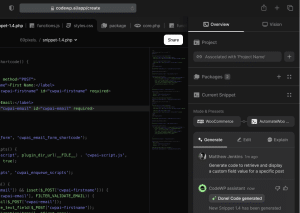
If you haven’t used AI yet, go ahead and give it a shot. Better yet, try CodeWP’s AI platform to generate custom solutions for your website. Create your own plugins from scratch, enhance a feature in your website, and many others - the AI tool can help you achieve your goals in a fraction of time.
We hope this article has been helpful! Be sure to check out our other articles where we review the best AI plugins to add to your WordPress website.