


If you've been building WordPress sites for a while, chances are you've crossed paths with the humble Contact Form 7 plugin. Because why wouldn’t you? It’s free, trusted, and gets the job done.
But its biggest downside - it looks too basic. It lacks the modern stylings and advanced features of premium form builders like Gravity Forms, WPForms, and Formidable Forms.
Thankfully, with some strategic code tweaks, you can seriously level up that basic Contact Form 7 instance. Sprinkle in some CSS and JavaScript, and you’ll turn your contact form into a lead-capturing machine that impresses your audience.
In this guide, we'll show you how to extend Contact Form 7 with some of the most useful upgrades using CodeWP’s AI generation capability. No extra plugin bloat required. Read on!
Why Use Contact Form 7 Plugin?
Contact Form 7 is a hugely popular plugin for adding contact forms to WordPress sites, and for good reason. It has built a solid reputation since its launch in 2007. As of this writing, the plugin has gathered over 5 million active installations along with thousands of glowing reviews.
The main draw? Its simplicity. Contact Form 7 makes it super easy to add a basic contact form to your site right out of the box. It's perfect if you need a no-fuss way for visitors to send you messages. Simply activate it, and you’ll have a ready-made form added to your site. You can instantly insert it on any page with just a shortcode.
But the beauty of Contact Form 7 is its flexibility too. The user-friendly interface allows total beginners to customize their forms by adding, removing, or rearranging fields with ease. You can make it as simple or complex as needed and style it to match your site's design.
The capabilities expand even further when you integrate it with other popular plugins like MailChimp, Constant Contact, and more. Having multiple forms for different purposes like quotes, surveys, etc. is easy too.
While the free version covers a lot of ground, users often extend it with add-ons, both free and paid. This unlocks more advanced functionality to meet unique business needs.
However, a single add-on may not always fulfill all your requirements. And as you rely more on add-ons, your site's performance can suffer.
If you’re comfortable with coding, you can easily extend Contact Form 7 without additional plugins. With custom codes, you're in complete control of how your forms look and function.
Today, AI is making things a whole lot better. You can now develop and enhance your WordPress site with less time and effort. CodeWP is a platform designed precisely for this purpose.
In the next section, we'll show you how to extend Contact Form 7’s functionalities by tapping into CodeWP's AI-powered capabilities.
9 Ways to Extend Contact Form 7 Using CodeWP
Contact Form 7 can be extended in several ways. Below, we've listed a few of the most popular customizations (and we might add more to this article in the future).
Note: Some of the generated code might conflict with your current WordPress theme's styling. You might need to reiterate your prompts to get the best results.
1) Contact Form 7 Spam Protection
Contact Form 7 includes spam protection features to prevent your WordPress site from receiving spam submissions through the contact forms. This is important because spam can clog your inbox and pose security risks.
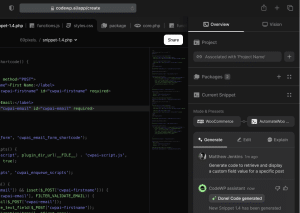
To enhance the spam filtering capabilities, we asked CodeWP to create a PHP validation code to filter spam messages by validating the text area field.
Here’s the generated code:
<?php

// Add action hook
add_action('wpcf7_validate_textarea','cwpai_custom_textarea_validation_filter', 10, 2);

function cwpai_custom_textarea_validation_filter($result, $tag) {
    // Get the form input
    $form_input = $_POST[$tag->name];

    // Define spam words
    $spam_words = array('spam', 'viagra', 'cialis', 'xanax', 'loan', 'credit', 'claim', 'won', 'selected', 'congratulations');

    // Check if any spam word exists in the input
    foreach($spam_words as $spam_word) {
        if(stripos($form_input, $spam_word) !== false) {
            // Add validation error
            $result->invalidate($tag, 'Please remove inappropriate words from your message.');
            break;
        }
    }
    return $result;
}
?>
The provided code is meant to be added to your WordPress site's functions.php file or as a custom plugin.
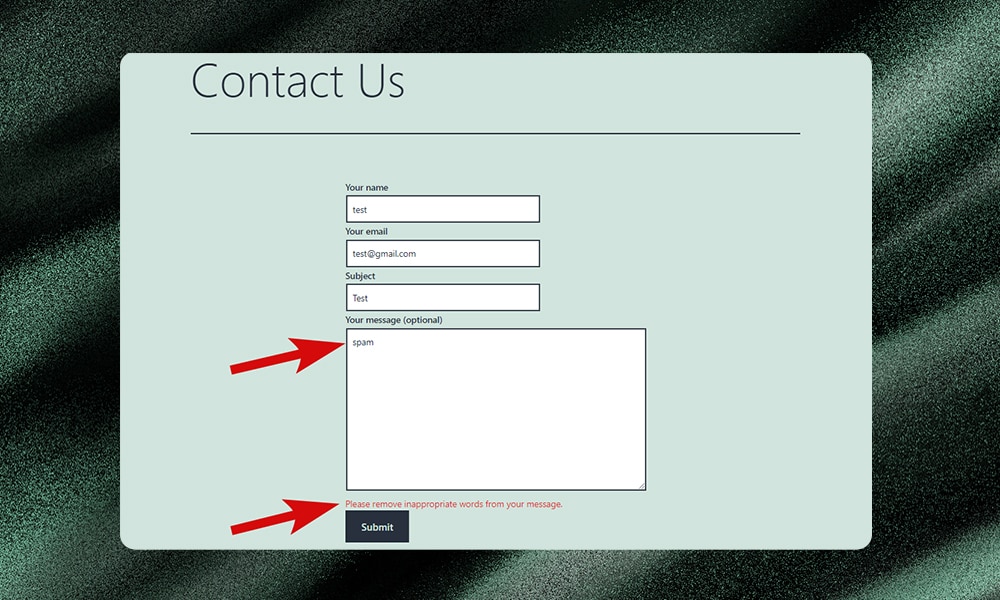
The function checks the submitted text area data against a list of ‘spam words.’ You can update the $spam_words array to add or remove words from the spam filter as needed.
If any of those spam words are found in the user's input (regardless of capitalization), it marks the form submission as invalid and displays an error message asking the user to remove the inappropriate words.
2) Contact Form 7 Mailchimp Extension
This code snippet allows you to seamlessly integrate your WordPress contact forms with the popular email marketing service, Mailchimp. It automates the process of adding new subscribers to your Mailchimp lists directly from your website's contact forms.
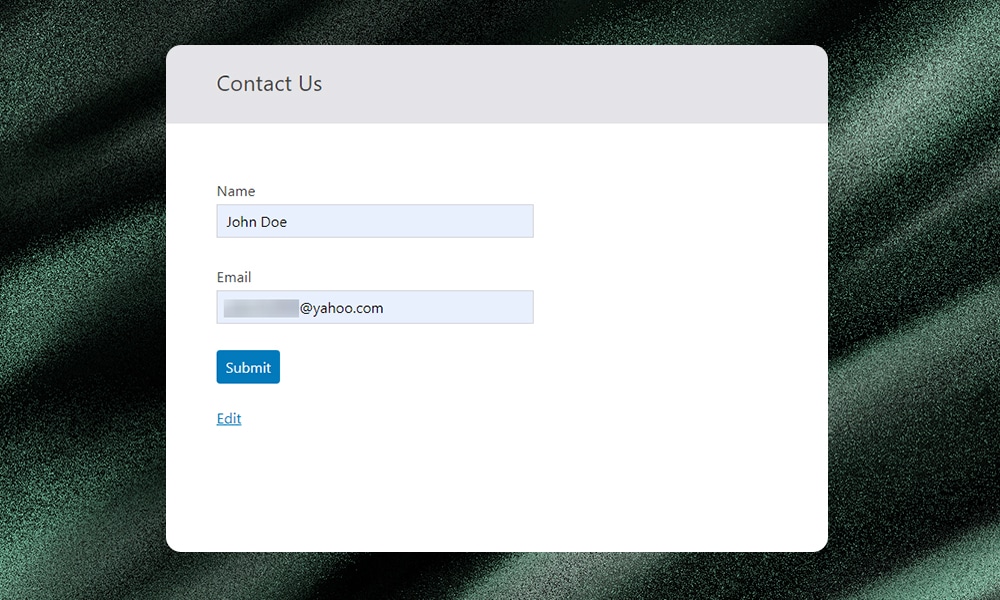
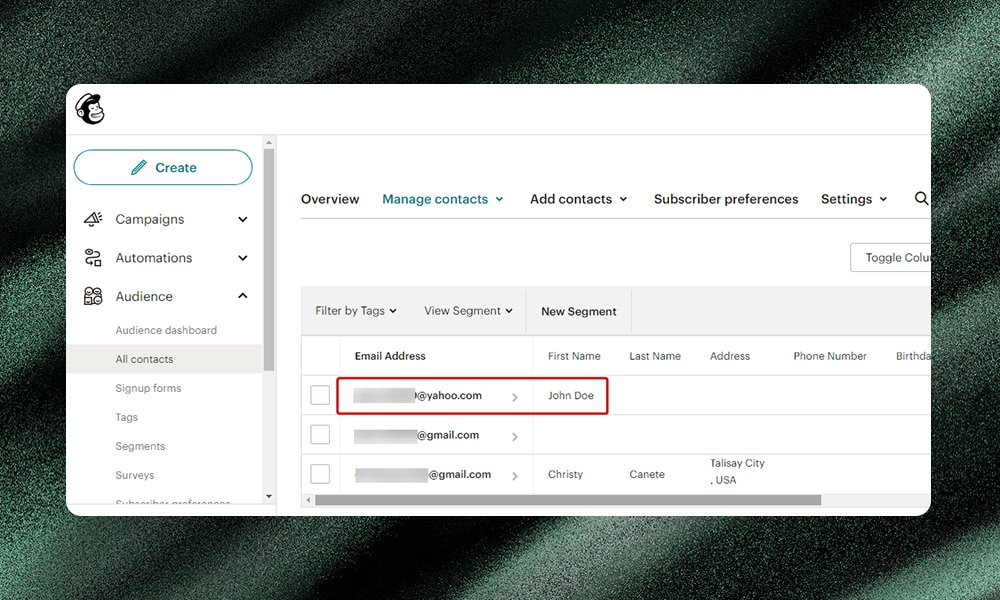
To implement this functionality, we asked CodeWP to generate code that integrates Contact Form 7 with Mailchimp. Here, users can subscribe by entering their name and email address in a simple form. Once submitted, their details are automatically added to a Mailchimp contact list.
Here’s the generated code:
add_action('wpcf7_before_send_mail', 'cwpai_cf7_mailchimp_integration');

function cwpai_cf7_mailchimp_integration($contact_form) {
    $submission = WPCF7_Submission::get_instance();
    if ($submission) {
        $posted_data = $submission->get_posted_data();
        $user_email = $posted_data['your-email'];
        $user_name = $posted_data['your-name'];

        $data_center = substr('your_mailchimp_api_key', strpos('your_mailchimp_api_key', '-')+1);
        $url = 'https://' . $data_center . '.api.mailchimp.com/3.0/lists/your_mailchimp_list_id/members/';

        $auth = base64_encode( 'user:your_mailchimp_api_key' );

        $body = json_encode([
            'email_address' => $user_email,
            'status' => 'subscribed',
            'merge_fields' => [
                'FNAME' => $user_name,
            ]
        ]);

        $options = [
            'http' => [
                'header' => "Content-type: application/x-www-form-urlencoded\r\nAuthorization: Basic $auth",
                'method' => 'POST',
                'content' => $body,
            ],
        ];

        $context = stream_context_create($options);
        $result = file_get_contents($url, false, $context);
    }
}
In this PHP code, we start by adding the MailChimp API through the autoload file. Then, using a hook, we run a function when a form is submitted. The user's name and email from the form data are then retrieved and sent to your MailChimp list. The new item is automatically marked as ‘subscribed.’
If the subscription is successful, it prints a success message. Otherwise, an error message from the MailChimp instance will be displayed.
Note: Make sure to replace 'your_mailchimp_api_key' and 'your_mailchimp_list_id' with your actual MailChimp API key and list ID.
3) Success Page Redirects
Success page redirects are useful for providing a better user experience after a form is successfully submitted. Instead of displaying a generic success message, you can redirect the user to a custom thank you page or any other URL of your choice.
Here’s the generated code:
add_action('wp_footer', 'cwpai_cf7_redirect');

function cwpai_cf7_redirect() {
    if (function_exists('wpcf7')) {
        echo "<script type='text/javascript'>
        document.addEventListener('wpcf7mailsent', function(event) {
            location = 'https://your-redirection-url.com'; //replace with your URL
        }, false);
        </script>";
    }
}
The code snippet above uses Contact Form 7's built-in 'wpcf7mailsent' event to detect when a form has been successfully submitted.
When this event is triggered, the JavaScript function executes. It grabs the URL specified in the code and redirects the user's browser to that URL using the window.location.replace() method.
To use this code, just replace 'https://your-redirection-url.com' with the actual URL you want users redirected to after form submission.
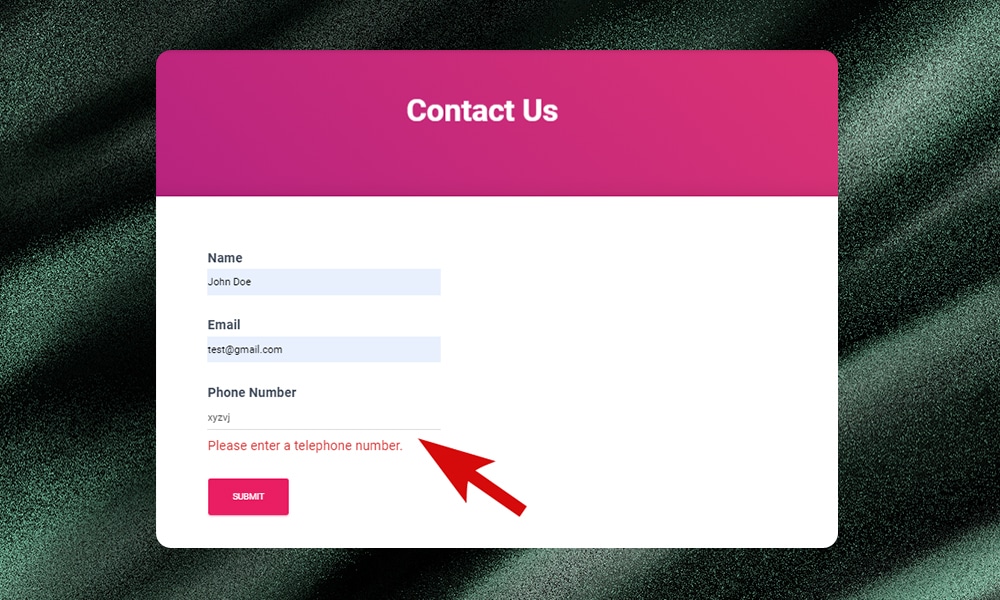
4) Data Type Validation
Data type validation in contact forms helps users input the correct data formats, preventing errors from invalid data.
For example, if a user enters an invalid phone number, the field gets highlighted, allowing them to quickly spot and correct the error before submitting the form. This not only enhances the user experience but also ensures data integrity and reduces issues like failed transactions.
Here’s the generated code:
<?php

function cwpai_is_valid_us_phone_number($number) {
    return preg_match('/\(?([0-9]{3})\)?([ .-]?)([0-9]{3})\2([0-9]{4})/', $number);
}

function cwpai_wpcf7_custom_validation($result, $tag) {
    $tag = new WPCF7_FormTag($tag);
    $name = $tag->name;
    $value = isset($_POST[$name]) ? trim(wp_unslash(strtr((string) $_POST[$name], "\n", " "))) : '';

    if ($name == 'your-phone') {
        if (!cwpai_is_valid_us_phone_number($value)) {
            $result->invalidate($tag, 'Please enter a valid US phone number!');
        }
    }
    return $result;
}
add_filter('wpcf7_validate_text', 'cwpai_wpcf7_custom_validation', 10, 2);
add_filter('wpcf7_validate_text*', 'cwpai_wpcf7_custom_validation', 10, 2);
The code snippet above adds custom validation to ensure that the entered phone number is a valid US phone number.
It includes a helper function that uses a regular expression to validate the phone number format. The main custom validation function checks if the field being validated is the 'your-phone' field and applies the validation logic. If the phone number is invalid, an error message is displayed.
To use this code, you need to add it to your theme's functions.php file. Make sure to update the field name ('your-phone') and the error message to match your Contact Form 7 form.
5) Add a Recipient Select Box
The code snippet below is a useful addition if you need to route form submissions to different recipients based on the user's selection.
For example, in a support desk scenario, users can choose the relevant department (sales, technical, billing) from the dropdown and ensure their inquiry reaches the appropriate team.
We asked CodeWP to write a code that allows users to select a recipient from a selectable dropdown when submitting a form.
Here’s the generated code:
<?php
add_action('wpcf7_mail_sent', 'cwpai_wpcf7_selectable_recipient', 10, 1);
function cwpai_wpcf7_selectable_recipient($contact_form) {
    $submission = WPCF7_Submission::get_instance();
    if ($submission) {
        $posted_data = $submission->get_posted_data();
        $recipient = $posted_data['recipient'];
        $mail = $contact_form->prop('mail');
        $mail['recipient'] = $recipient;
        $contact_form->set_properties(array('mail' => $mail));
    }
}
?>
Here's the HTML structure (place this in Contact Form 7's form settings):
<label>Your Email (required)</label>[email* your-email]
<label>Recipient</label>[select recipient "user1@example.com" "user2@example.com"]
<label>Subject</label>[text your-subject]
<label>Your Message</label>[textarea your-message]
[submit "Send"]
The code snippet above hooks into Contact Form 7's mail sent action and retrieves the posted form data. It then extracts the recipient’s email address from the posted form data and retrieves the current recipient configured for the form. The recipient email is updated with the newly selected recipient from the dropdown.
Finally, it sets this updated recipient email as the new property for the form so that the email is sent to the chosen recipient.
6) City Field Extension
Adding a city field in Contact Form 7 is useful when you need to capture the city information from users, especially for businesses that operate in multiple locations.
A practical use case would be for a delivery service that needs to know the customer's city for logistics and shipping purposes. This auto-complete feature is not only convenient but also reduces spelling mistakes when entering addresses.
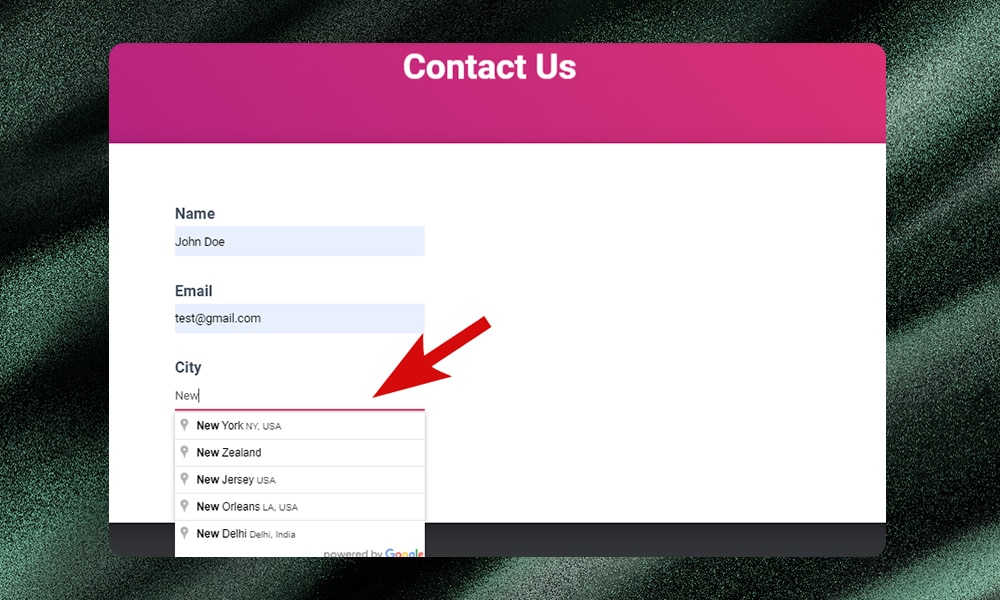
We asked CodeWP to write a code for Contact Form 7 that hooks into the Google Maps API. When a user begins typing in the name of a city, the field begins to auto-complete the field, depending on what's being typed.
Here’s the generated code:
function cwpai_add_city_field($tag) {
    if ($tag['name'] != 'city') return $tag;

    $tag['values'] = array();
    $tag['raw_values'] = array();
    $tag['labels'] = array();
    $tag['raw_labels'] = array();
    $tag['pipes'] = new WPCF7_Pipes(array());
    $tag['type'] = 'text';
    $tag['basetype'] = 'text';

    return $tag;
}
add_filter('wpcf7_form_tag', 'cwpai_add_city_field');

function cwpai_enqueue_google_maps_script() {
    wp_enqueue_script( 'google-maps', 'https://maps.googleapis.com/maps/api/js?key=YOUR_API_KEY&libraries=places', array(), '1.0.0', true );
}
add_action( 'wp_enqueue_scripts', 'cwpai_enqueue_google_maps_script' );

function cwpai_add_autocomplete_script() {
    wp_add_inline_script( 'google-maps', "
        function initializeAutocomplete(){
            var input = document.querySelector('input[name=\"city\"]');
            new google.maps.places.Autocomplete(input);
        }
        google.maps.event.addDomListener(window, 'load', initializeAutocomplete);
    " );
}
add_action( 'wp_enqueue_scripts', 'cwpai_add_autocomplete_script' );
This PHP code adds a filter to the wpcf7_form_tag hook that changes the city field's properties. Then, it enqueues the Google Maps JavaScript library. Make sure to replace YOUR_API_KEY with your actual Google Maps API key.
Finally, it adds an inline script that initializes the autocomplete functionality on the city field. The autocomplete will start to suggest city names as soon as the user starts typing in the city field.
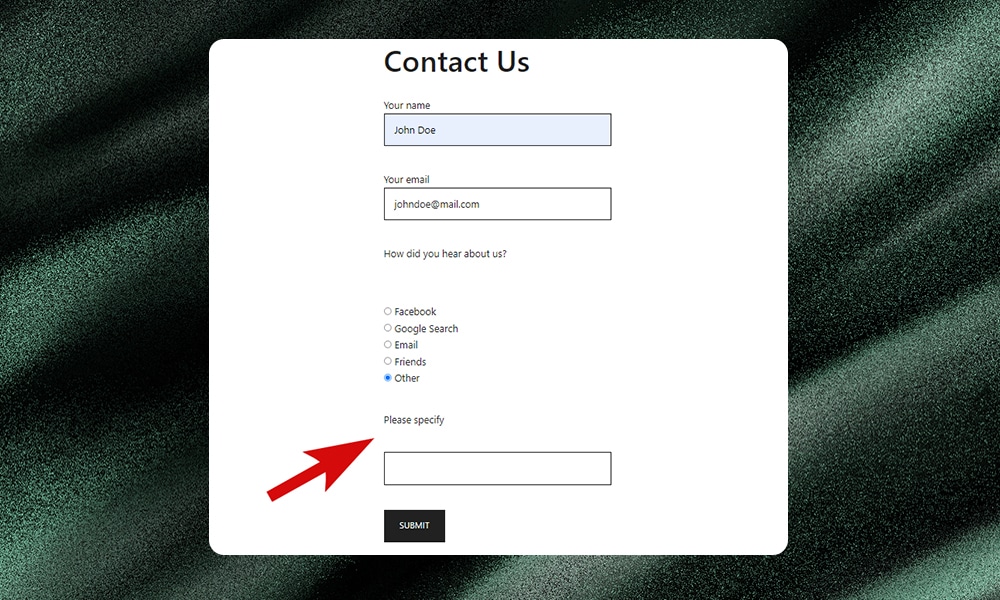
7) Conditional Fields
Conditional fields are useful when you need to dynamically show or hide certain form fields based on the user's input or selection. A good application would be a survey or feedback form where additional details are needed based on the user's response to a specific question.
For this example, we created a form that asks how the user heard about the company, with options like Facebook, Google Search, Email, Friends, and Other. When ‘Other’ is selected, a text field is displayed for the user to specify the other method. When any other option is selected, the text field is hidden.
This script targets an existing Contact Form 7 form and uses jQuery to add the conditional logic.
Here’s the generated code:
<script>
jQuery(document).ready(function($) {
// Function to toggle visibility of the 'Other' text field
$('.contact-form').on('change', 'input[name="how_heard"]', function() {
if ($(this).val() === 'Other') {
$('.other-option').show();
} else {
$('.other-option').hide();
}
});
});
</script>function cwpai_enqueue_custom_scripts() {
wp_enqueue_script('cwpai-custom-script', get_template_directory_uri() . '/js/cwpai-custom.js', array('jquery'), null, true);
$script_data = array(
'otherOptionSelector' => '.wpcf7-form-control-wrap.other-method input',
'textFieldSelector' => '.wpcf7-form-control-wrap.other-text',
);
wp_localize_script('cwpai-custom-script', 'cwpaiData', $script_data);
}
add_action('wp_enqueue_scripts', 'cwpai_enqueue_custom_scripts');The jQuery script above waits for the page to fully load before listening for changes on the radio buttons in the Contact Form 7 form. When the 'Other' option is selected, the script displays a previously hidden text field for additional input. If any other option is chosen, the text field remains hidden.
A function is also generated to enqueue the custom jQuery script. It uses wp_localize_script to securely pass PHP values to your JavaScript to maintain smooth interaction within your WordPress environment.
Note: To add the script file, follow these steps. First, go to your theme's directory and create a new folder within it. You can name it 'js' (or any preferred name). Inside this folder, place your '.js' file (in this example, we've named it cwpai-custom.js). This means your JavaScript file should now be located at wp-content/themes/your-theme/js/cwpai-custom.js.
Next, open your functions.php file in the same directory and add the provided function code near the top. Save all the changes once completed.
8) Multi-Step Form
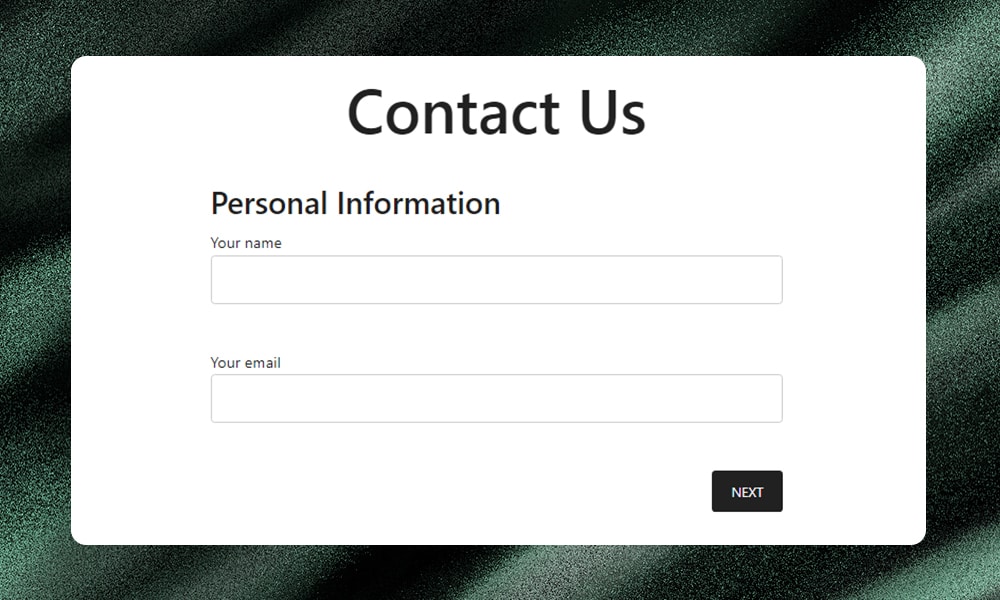
A multi-step form divides a form into multiple sections or steps, allowing users to complete the form in a more organized and structured manner. This type of form is useful when you need to collect a large amount of information or when the form fields need to be logically grouped into different categories.
Unfortunately, this feature is not available in Contact Form 7. But you can add this functionality using the custom code below.
The form is divided into three steps:
- Personal Information: This step displays input fields for the name and email.
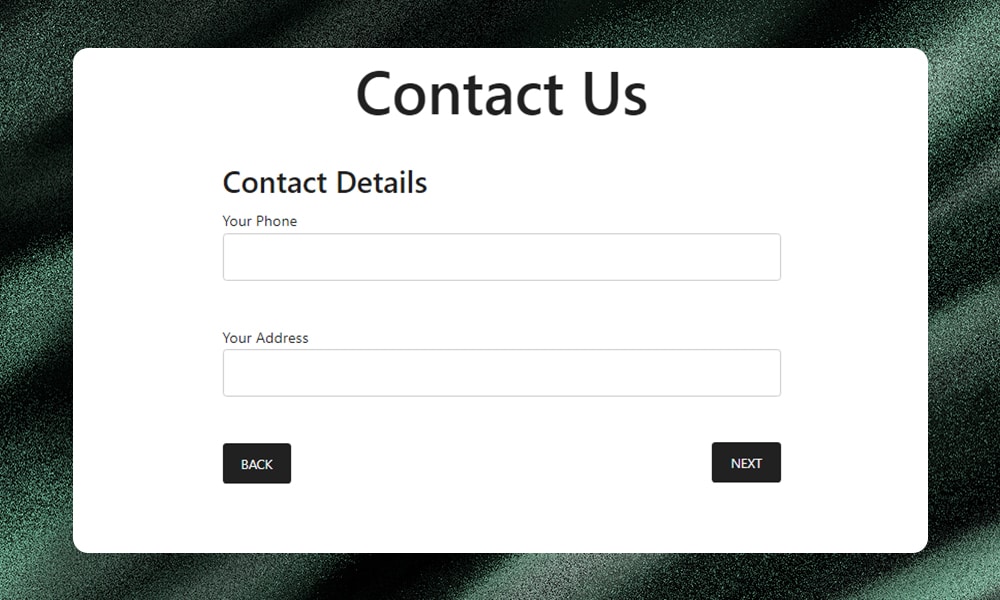
- Contact Details: This step shows input fields for the phone number and address.
- Your Message: This final step presents input fields for the subject and comment.
Each step contains navigation buttons to move between steps. Using a shortcode [cwpai_contact_form], you can add the form to your posts, pages, or widgets.

For this example, we’ve generated four files.
Here’s the generated HTML:
<div class="cwpai-step-form">
    <div class="cwpai-step" id="cwpai-step-1">
        <h3>Personal Information</h3>
        <label> Your name
            [text* your-name autocomplete:name] </label>
        <label> Your email
            [email* your-email autocomplete:email] </label>
        <div class="cwpai-buttons">
            <button type="button" class="cwpai-next-btn">Next</button>
        </div>
    </div>

    <div class="cwpai-step" id="cwpai-step-2" style="display:none;">
        <h3>Contact Details</h3>
        <label>Your Phone<br />
            [tel your-phone] </label>
        <label>Your Address<br />
            [text your-address] </label>
        <div class="cwpai-buttons">
            <button type="button" class="cwpai-prev-btn">Back</button>
            <button type="button" class="cwpai-next-btn">Next</button>
        </div>
    </div>

    <div class="cwpai-step" id="cwpai-step-3" style="display:none;">
        <h3>Your Message</h3>
        <label>Subject<br />
            [text your-subject] </label>
        <label>Message<br />
            [textarea your-message] </label>
        <div class="cwpai-buttons">
            <button type="button" class="cwpai-prev-btn">Back</button>
            <button type="button" class="cwpai-next-btn">Submit</button>
        </div>
    </div>

</div>
Here’s the generated JavaScript:
document.addEventListener('DOMContentLoaded', function() {
var currentStep = 1;
var totalSteps = document.querySelectorAll('.cwpai-step').length;

function showStep(step) {
document.querySelectorAll('.cwpai-step').forEach(function(el) {
el.style.display = 'none';
});
document.querySelector('#cwpai-step-' + step).style.display = 'block';
}

function nextStep() {
if (currentStep < totalSteps) {
currentStep++;
showStep(currentStep);
}
}

function prevStep() {
if (currentStep > 1) {
currentStep--;
showStep(currentStep);
}
}

document.querySelectorAll('.cwpai-next-btn').forEach(function(button) {
button.addEventListener('click', nextStep);
});

document.querySelectorAll('.cwpai-prev-btn').forEach(function(button) {
button.addEventListener('click', prevStep);
});

// Initialize the form with the first step visible
showStep(currentStep);
});
Here’s the generated CSS:
.cwpai-step-form {
width: 100%;
max-width: 600px; /* Adjust as needed */
margin: 0 auto;
}

.cwpai-step {
display: none;
}

.cwpai-step:first-child {
display: block;
}

.cwpai-step h3 {
margin-bottom: 10px;
}

.cwpai-step label {
display: block;
margin-bottom: 10px;
}

.cwpai-step input[type="text"],
.cwpai-step input[type="email"],
.cwpai-step input[type="tel"],
.cwpai-step textarea {
width: 100%;
padding: 8px;
margin-bottom: 10px;
border: 1px solid #ccc;
border-radius: 4px;
}

.cwpai-buttons {
overflow: hidden; /* Clear floats */
}

.cwpai-buttons button {
padding: 10px 20px;
color: #fff;
border: none;
border-radius: 4px;
cursor: pointer;
float: left;
margin-right: 0px;
}

.cwpai-buttons button.cwpai-next-btn {
float: right;
margin-right: 0; /* Reset margin for the last button */
}

.cwpai-step button:hover {
background-color: #0056b3;
}
Here’s the generated function:
function cwpai_enqueue_scripts() {
wp_enqueue_script('cwpai-multi-step-form', get_template_directory_uri() . '/js/cwpai-multi-step-form.js', array('jquery'), '1.0.0', true);
}
add_action('wp_enqueue_scripts', 'cwpai_enqueue_scripts');

function cwpai_enqueue_styles() {
// Enqueue custom CSS file
wp_enqueue_style( 'custom-style', get_stylesheet_directory_uri() . '/cwpai-custom-css.css', array(), '1.0', 'all' );
}
add_action( 'wp_enqueue_scripts', 'cwpai_enqueue_styles' );
First, there's the HTML structure that needs to be pasted into Contact Form 7's form settings. The buttons are wrapped in a class for easy styling.
Next, the 'cwpai-multi-step-form.js' file is generated and saved under the theme's 'js' folder (you might need to create this folder if you don’t have it). This JavaScript file contains the code to handle the 'Next' and 'Back' buttons for navigating through the different steps of the Contact Form 7 form. Event listeners are added to these buttons to increment or decrement the current step and display the appropriate step when clicked.
CSS is also included to style the buttons and fields in the form. The .cwpai-step-button class styles the buttons with a dark color scheme, rounded corners, and a hover effect for better interaction.
Lastly, a PHP function is provided to enqueue the JavaScript and CSS files, ensuring they are loaded correctly.
9) Contact Form With Date and Time Picker
If your business requires scheduling appointments, reservations, or bookings, you’ll find this extended feature very useful.
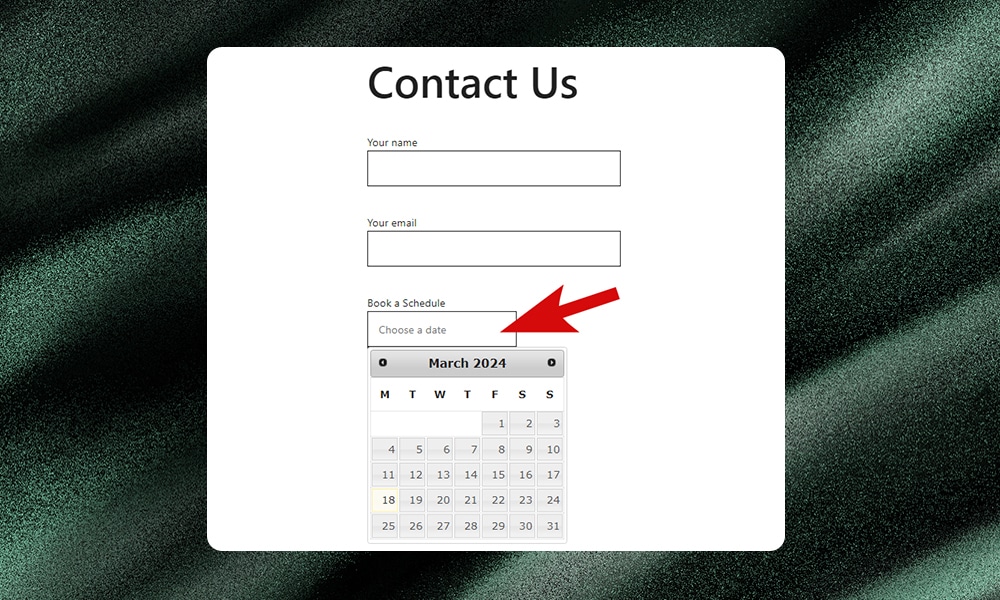
Using CodeWP, we’ve generated the WordPress function, HTML structure, and JQuery to add a date and time picker in the Contact Form 7 form. It contains the following fields:
- Name
- Book a schedule (users can select their desired date and time)
Here’s the generated function:
function cwpai_enqueue_date_time_picker_assets() {
    wp_enqueue_script('jquery-ui-timepicker', get_template_directory_uri() . '/js/jquery-ui-timepicker-addon.js', array('jquery', 'jquery-ui-datepicker', 'jquery-ui-slider'), '1.6.3', true);
    wp_enqueue_style('jquery-ui-css', 'https://ajax.googleapis.com/ajax/libs/jqueryui/1.12.1/themes/smoothness/jquery-ui.css');
}
add_action('wp_enqueue_scripts', 'cwpai_enqueue_date_time_picker_assets');
Here’s the generated JQuery:
jQuery(document).ready(function($){
$('.wpcf7-date').datepicker();
$('.wpcf7-time').timepicker({
timeFormat: 'HH:mm',
interval: 15,
minTime: '10:00',
maxTime: '18:00',
defaultTime: '11:00',
startTime: '10:00',
dynamic: false,
dropdown: true,
scrollbar: true
});
});
Here’s the generated HTML:
<div class="form-container">
    <div class="wpcf7-form">

        <h1> Contact Us </h1>

        <label> Your name
            [text* your-name autocomplete:name] </label>

        <label> Your email
            [email* your-email autocomplete:email] </label>

        <label>Book a Schedule</label>
        <input type="text" class="wpcf7-date" name="your-date" placeholder="Choose a date" />
        <input type="text" class="wpcf7-time" name="your-time" placeholder="Choose a time" />

        [submit "Submit"]

    </div>
</div>
The JQuery code above enhances Contact Form 7 by adding date and time picker functionality to specific form fields. It waits for the page to fully load, then applies a date picker to any fields with the class ‘wpcf7-date’ and a time picker to fields with ‘wpcf7-time.’
The HTML structure is pasted into Contact Form 7’s form settings. Then, we generated the function to enqueue the JQuery library.
Tips When Customizing Contact Form 7
Tailoring Contact Form 7 to your specific needs is great, but there's an art to doing it right. Here are some of the best practices to keep in mind:
- Keep It Lean and Clean: While it's tempting to ask for every tiny detail upfront, resist the urge to make your form a mile long. Stick to only the essential fields to keep things easy for your visitors.
- Use Placeholder Text: Placeholder text is an awesome way to provide some handy guidance on what each field is asking for. Sometimes you can ditch the field titles altogether and just rely on well-written placeholders for a cleaner, less cluttered form design.
- Provide Clear Confirmation Messages: After submission, display clear confirmation messages to assure users that their form has been successfully submitted. Consider including the next steps or additional information if necessary.
- Test Your Form Regularly: Validate those input fields, check for errors, and ensure submissions are landing in the right inbox. A little maintenance goes a long way.
- Implement Spam Protection: Integrate CAPTCHA or reCAPTCHA to prevent spam submissions. This helps maintain the integrity of your inbox and ensures genuine inquiries are prioritized.
- Use a Child Theme: When customizing Contact Form 7, work within a child theme rather than modifying the parent theme directly. This protects your changes during updates and prevents conflicts.
- Test on a Sandbox First: Set up a sandbox testing environment to identify potential issues beforehand. It's an extra step, but far better than breaking things in front of your audience.
Wrapping It Up
Hopefully, the code examples covered gave you some useful ideas for enhancing your Contact Form 7. While it might require some tinkering, the flexibility of this free plugin makes it well worth the effort.
And having a co-pilot like CodeWP makes those tweaks and enhancements so much easier to implement. With AI, you can generate the custom snippets you need in practically no time at all.
So don't be afraid to get your hands dirty and really make Contact Form 7 your own. This versatile plugin has way more tricks up its sleeve than you might think. Whether you're tackling integrations or advanced functionalities, CodeWP’s got your back. All you need is a little bit of creativity and a few minutes to commit.