


ChatGPT has been making waves with its ability to understand and generate human-like text.
It can engage in conversations, answer queries, and even assist in complex tasks like building a website.
But the question is, can an AI language model effectively fill a web developer’s shoes?
Honestly, we don’t think AI can fully replace a skilled developer just yet. However, ChatGPT can be an incredible assistant, especially in web design. It can quickly generate code, suggest design elements, and even help troubleshoot problems, all of which can significantly speed up the web development process.
So, instead of spending hours building a web page, you can easily create one in minutes.
Curious about how to use ChatGPT to build a website? You're in the right place. Just follow the simple steps below to get started.
Things to Do Before Creating Your Website With ChatGPT
1) Create an Account on OpenAI
Before we begin, make sure that you have signed up on OpenAI.
Creating an account is quick and easy. Just go to the OpenAI website and enter your email address and password.
Note that ChatGPT comes in two versions: ChatGPT (free) and ChatGPT Plus (paid version).
The free version is powered by GPT-3.5 which is capable of understanding and generating natural language or code. ChatGPT Plus, on the other hand, runs on the GPT-4 model. It has more processing power, higher accuracy, and is less prone to ‘hallucinations’ compared to GPT-3.5.
For optimal results, we highly recommend getting the Plus plan at $20 per month.
2) Define Your Website’s Purpose
Are you setting up an e-commerce, a portfolio, a blog, or something entirely different? Knowing this shapes the design and content of your website.
When you're clear about your site's purpose, ChatGPT can provide more targeted and relevant assistance.
For our purposes, we’re going to create a travel and tour website.
3) Plan the Structure of Your Website
Time to lay out your website's blueprint.
Think about how visitors will move from one page to another. What pages will you need? How will they link together? Will you have a navigation bar, a footer, and maybe some dropdown menus? This step is crucial for a good user experience and helps with SEO, too.
Don’t know where to start? You can use ChatGPT to brainstorm and refine your ideas to make your site both functional and user-friendly.
Here are a few tips on how to use ChatGPT to generate the best output.
4) Prepare Your Content and Images
Prepare your content and images before creating a website.
Start by writing the text for each page. Focus on clarity and relevance to your audience. Keep it engaging and on-brand.
If writing isn’t your forte, consider using ChatGPT or other AI writing tools to generate drafts quickly. AI tools like DALL-E and Midjourney can also help you generate images for your website.
A word of warning: AI content can sound blandly repetitive and often lack the natural flow. Always fact-check and humanize your content before publishing it.
How to Build a Website With ChatGPT
In the next steps, we’re going to show you how to create a basic homepage using ChatGPT.
We've found that ChatGPT works best with shorter content requests. So, instead of asking it to generate an entire homepage at once, we'll tackle it section by section. This way, we avoid overloading the tool and get more detailed code for each part of your site.
1) Set Your Requirements
To get the best out of ChatGPT for your website, start with a detailed prompt. You can mention the features you want or the programming language you're using. This level of detail helps ChatGPT generate the output that you want and make your web development process more efficient.
For our travel and tour website, we needed a simple homepage. We told ChatGPT exactly what features we wanted, the style we were after, and the coding languages we planned to use.
Here's how we phrased our prompt:
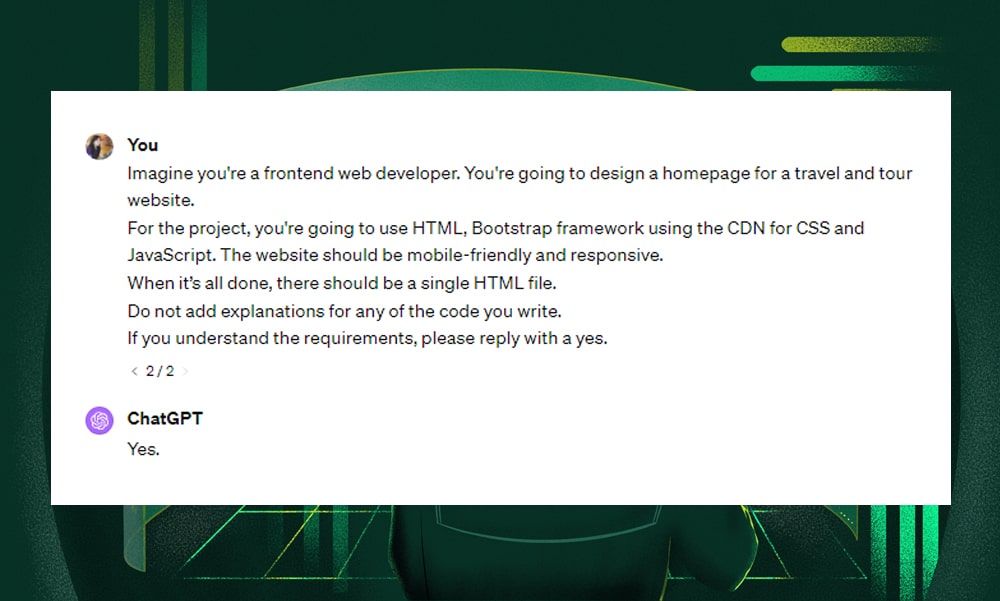
Imagine you're a front-end web developer. You're going to design a homepage for a travel and tour website.
For the project, use the following languages: HTML, Bootstrap framework using the CDN for CSS, and JavaScript. The website should be mobile-friendly and responsive.
When it’s all done, there should be a single HTML file.
Do not add explanations for any of the code you write.
If you understand the requirements, please reply with a yes.
2) Create a Header and a Slider
Once ChatGPT responds with a ‘yes,’ you’re ready to create the first part of your homepage.
In this example, we’re going to create a header that overlays on an image slider. We’ll also add a search bar at the center of the image.
Here’s how we requested ChatGPT to generate the code:
First, we're going to create the header. It should contain the company logo and navigation menu for the 'Destinations', 'Private Rentals', 'About Us', 'Blog', and 'Contact Us.' Set the height of the logo image to 50px.
The left and right paddings of the header should be 100px. The top padding should be 20px. The font color should be white. The distance between each menu should be 40px. Set the space of each letter to 5px.
The background color of the header should be transparent and overlay on the slider image.
After the header, add a slider. It should display three images. Each slide should start fading 2 seconds after the preceding slide. The slider should have a height of 100vh.
The brand color should consist of #002347, #003366, #003f7d, #ff8e00, #fd7702 and #ff5003.
Then, add a search bar at the center of the slider. Use a form for the search bar. Add a Font Awesome icon on the search bar which the user can click to submit their query. Color this icon gray. The icon should be on the right side. The corner of the search bar should be round. The height should be 20px and the width should be 250px.
Here’s the output we got:
<!DOCTYPE html>
<html lang="en">
<head>
    <meta charset="UTF-8">
    <meta name="viewport" content="width=device-width, initial-scale=1.0">
    <title>Travel and Tour Website</title>
    <link href="https://cdn.jsdelivr.net/npm/bootstrap@5.1.3/dist/css/bootstrap.min.css" rel="stylesheet">
    <link href="https://cdnjs.cloudflare.com/ajax/libs/font-awesome/5.15.3/css/all.min.css" rel="stylesheet">
    <style>
        body {
            font-family: 'Arial', sans-serif;
        }
        .header {
            padding: 20px 100px;
            color: white;
            background-color: transparent;
            position: absolute;
            width: 100%;
            z-index: 1000;
        }
        .header img {
            height: 50px;
        }
        .nav-link {
            color: white;
            margin-right: 40px;
            letter-spacing: 5px;
        }
        .nav-link:last-child {
            margin-right: 0;
        }
        .slider {
            height: 100vh;
        }
        .search-bar {
            position: absolute;
            top: 50%;
            left: 50%;
            transform: translate(-50%, -50%);
            width: 250px;
            height: 20px;
            border-radius: 50px;
            padding: 10px;
            background-color: white;
        }
        .search-bar .fa-search {
            color: gray;
        }
    </style>
</head>
<body>

<header class="header">
    <nav class="navbar navbar-expand-lg">
        <a class="navbar-brand" href="#">
            <img src="logo.png" alt="Company Logo">
        </a>
        <div class="collapse navbar-collapse">
            <ul class="navbar-nav ml-auto">
                <li class="nav-item"><a class="nav-link" href="#">Destinations</a></li>
                <li class="nav-item"><a class="nav-link" href="#">Private Rentals</a></li>
                <li class="nav-item"><a class="nav-link" href="#">About Us</a></li>
                <li class="nav-item"><a class="nav-link" href="#">Blog</a></li>
                <li class="nav-item"><a class="nav-link" href="#">Contact Us</a></li>
            </ul>
        </div>
    </nav>
</header>

<div id="carouselExampleFade" class="carousel slide carousel-fade slider" data-bs-ride="carousel">
    <div class="carousel-inner">
        <div class="carousel-item active" data-bs-interval="2000">
            <img src="slide1.jpg" class="d-block w-100" alt="Slide 1">
        </div>
        <div class="carousel-item" data-bs-interval="2000">
            <img src="slide2.jpg" class="d-block w-100" alt="Slide 2">
        </div>
        <div class="carousel-item" data-bs-interval="2000">
            <img src="slide3.jpg" class="d-block w-100" alt="Slide 3">
        </div>
    </div>
</div>

<div class="search-bar">
    <form action="/search" method="get">
        <input type="text" class="form-control" placeholder="Search...">
        <i class="fas fa-search"></i>
    </form>
</div>

<script src="https://cdn.jsdelivr.net/npm/bootstrap@5.1.3/dist/js/bootstrap.bundle.min.js"></script>
</body>
</html>
As you’ve noticed, we’ve included all the details we want to achieve, like the font size, colors, height and width of the search bar, and many others. You can rewrite the template above to fit your own requirements.
Remember to specify any particular style or theme you're following. If you're using a framework like Bootstrap, you can mention that too. ChatGPT will then use your prompt to generate the code. Fine-tune this later on to ensure that they fit perfectly into your website's design.
Next, copy the codes generated and paste them into your favorite editor. Here, we’ve used Visual Studio Code.
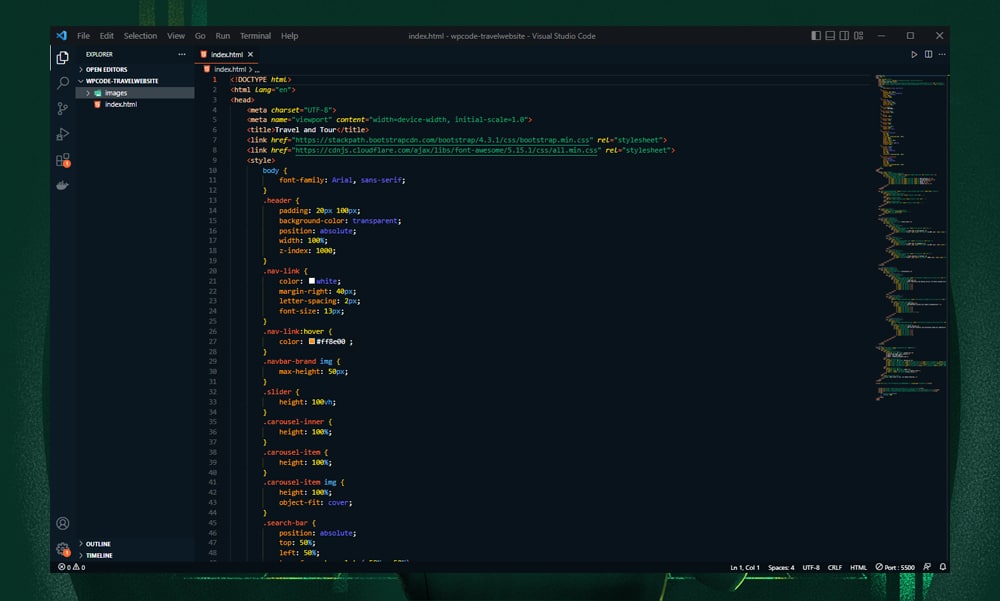
AI is not perfect, and you might need to tweak the code a bit to get the output you want. For instance, you can adjust the image height or font size to your liking. You should also replace the image paths to display your own images.
Save the code within your editor as index.html. Then, click the file to open it in your browser.
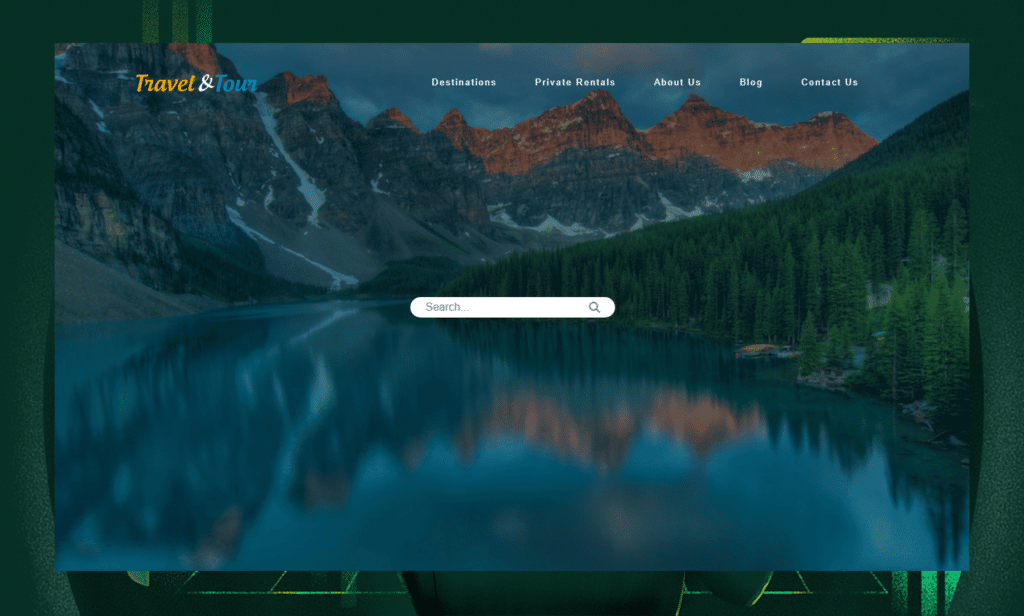
Here’s our result:
3) Add a Content
This could be anything. For our travel and tour website, we’re going to add a section that displays package tours on sale.
Here’s our ChatGPT prompt:
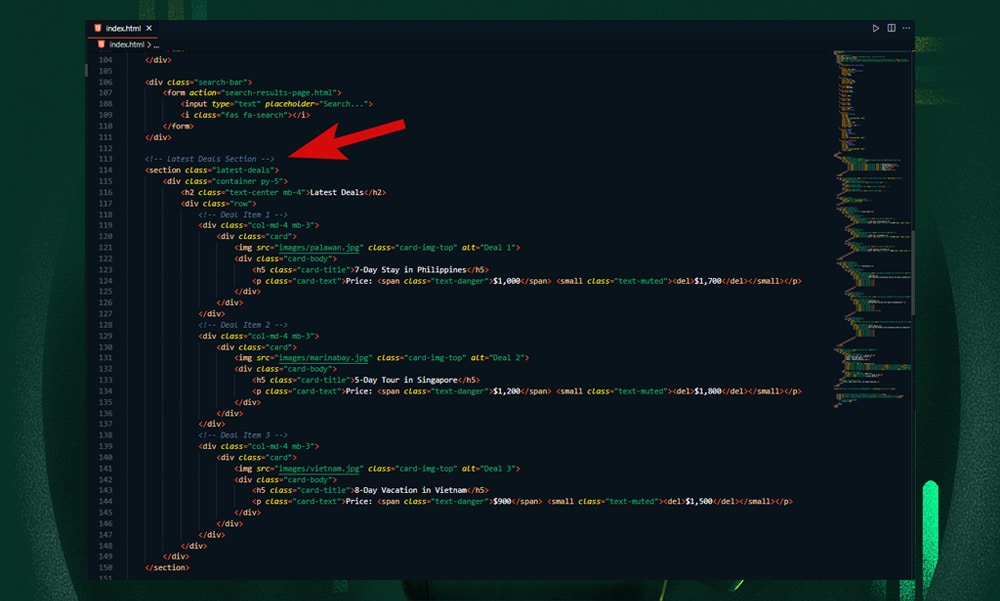
I want you to add another section on the homepage. It should display the latest deals on the website.
The title should be 'Latest Deals'.
Then, display three items containing an image, the name of the place, and the current price at a 20% discount.
Here’s a look at the code written by ChatGPT:
<!-- Latest Deals Section -->
<section class="latest-deals">
    <div class="container py-5">
        <h2 class="text-center mb-4">Latest Deals</h2>
        <div class="row">
            <!-- Deal Item 1 -->
            <div class="col-md-4 mb-3">
                <div class="card">
                    <img src="deal1.jpg" class="card-img-top" alt="Deal 1">
                    <div class="card-body">
                        <h5 class="card-title">Place Name 1</h5>
                        <p class="card-text">Price: <span class="text-danger">$80</span> <small class="text-muted"><del>$100</del></small></p>
                    </div>
                </div>
            </div>
            <!-- Deal Item 2 -->
            <div class="col-md-4 mb-3">
                <div class="card">
                    <img src="deal2.jpg" class="card-img-top" alt="Deal 2">
                    <div class="card-body">
                        <h5 class="card-title">Place Name 2</h5>
                        <p class="card-text">Price: <span class="text-danger">$120</span> <small class="text-muted"><del>$150</del></small></p>
                    </div>
                </div>
            </div>
            <!-- Deal Item 3 -->
            <div class="col-md-4 mb-3">
                <div class="card">
                    <img src="deal3.jpg" class="card-img-top" alt="Deal 3">
                    <div class="card-body">
                        <h5 class="card-title">Place Name 3</h5>
                        <p class="card-text">Price: <span class="text-danger">$160</span> <small class="text-muted"><del>$200</del></small></p>
                    </div>
                </div>
            </div>
        </div>
    </div>
</section>
At the end of the code, ChatGPT might include instructions to complete the output. For instance, you might be asked to update the texts and image paths.
Add the code to your index.html file. Make sure the code is placed within the body tag and before the script tag, as shown below.
Here’s what our output looks like:

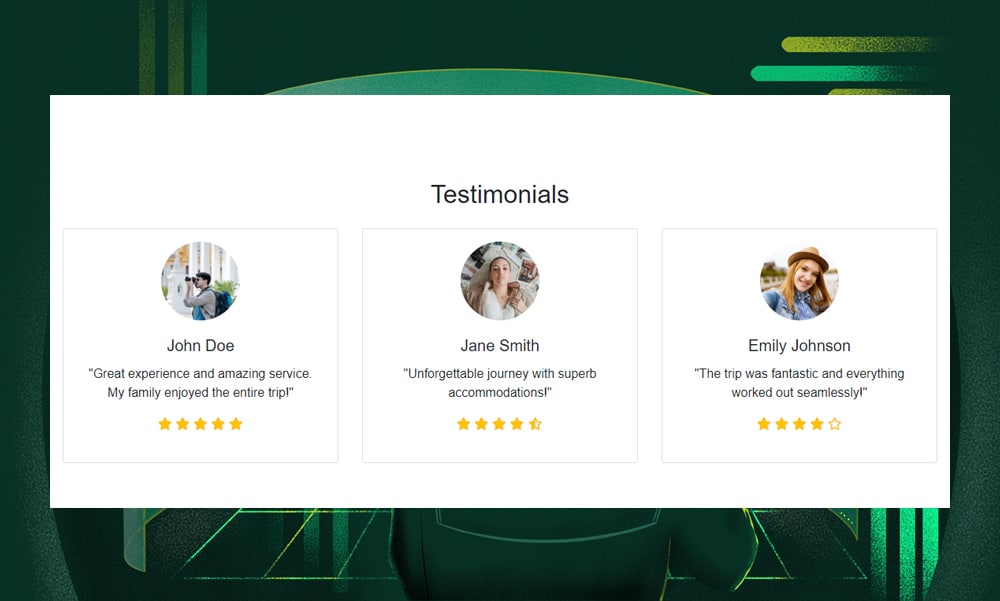
4) Create a Testimonial Section
Next, we’re going to add a testimonial section.
Here’s the prompt we’ve used:
I want you to add another section on the homepage. It should display testimonies from other people.
The title should be 'Testimonials'.
Display three items containing an image, the name of the person, the star rating, and the actual testimony of users. Display the image in a circular shape. The star rating should be colored yellow.
You might want to edit the prompt above, depending on how you want to arrange your elements. This is the code that ChatGPT generated:
<!-- Testimonials Section -->
    <section class="testimonials">
        <div class="container py-5">
            <h2 class="text-center mb-4">Testimonials</h2>
            <div class="row">
                <!-- Testimonial Item 1 -->
                <div class="col-md-4 mb-3">
                    <div class="card">
                        <img src="images/johndoe.jpg" class="card-img-top rounded-circle mx-auto mt-3" alt="Person 1" style="width: 100px; height: 100px;">
                        <div class="card-body text-center">
                            <h5 class="card-title">John Doe</h5>
                            <p class="card-text">"Great experience and amazing service. My family enjoyed the entire trip!"</p>
                            <p class="text-warning">
                                <i class="fas fa-star"></i>
                                <i class="fas fa-star"></i>
                                <i class="fas fa-star"></i>
                                <i class="fas fa-star"></i>
                                <i class="fas fa-star"></i>
                            </p>
                        </div>
                    </div>
                </div>
                <!-- Testimonial Item 2 -->
                <div class="col-md-4 mb-3">
                    <div class="card">
                        <img src="images/janesmith.jpg" class="card-img-top rounded-circle mx-auto mt-3" alt="Person 2" style="width: 100px; height: 100px;">
                        <div class="card-body text-center">
                            <h5 class="card-title">Jane Smith</h5>
                            <p class="card-text">"Unforgettable journey with superb accommodations!"</p>
                            <p class="text-warning">
                                <i class="fas fa-star"></i>
                                <i class="fas fa-star"></i>
                                <i class="fas fa-star"></i>
                                <i class="fas fa-star"></i>
                                <i class="fas fa-star-half-alt"></i>
                            </p>
                        </div>
                    </div>
                </div>
                <!-- Testimonial Item 3 -->
                <div class="col-md-4 mb-3">
                    <div class="card">
                        <img src="images/emilyjohnson.jpg" class="card-img-top rounded-circle mx-auto mt-3" alt="Person 2" style="width: 100px; height: 100px;">
                        <div class="card-body text-center">
                            <h5 class="card-title">Emily Johnson</h5>
                            <p class="card-text">"The trip was fantastic and everything worked out seamlessly!"</p>
                            <p class="text-warning">
                                <i class="fas fa-star"></i>
                                <i class="fas fa-star"></i>
                                <i class="fas fa-star"></i>
                                <i class="fas fa-star"></i>
                                <i class="fa fa-star-o"></i>
                            </p>
                        </div>
                    </div>
                </div>
            </div>
        </div>
    </section>
Once again, copy this code and add it to your index.html file.
Here’s what our testimonial section looks like:
5) Create a Footer
To create a footer using ChatGPT, you'll want to be clear about what elements it should include.
Typically, a footer contains contact information, social media links, quick links to main pages, and legal information like terms of service and privacy policy.
You can follow this prompt to generate codes for the footer:
Please create a footer for the homepage. It should include the address, phone number, and email.
Add a 'Follow Us' header with the social media icons for Facebook, Twitter, Instagram, and YouTube. Add a padding of 10px for each social media icon.
Add links for the terms of use and privacy policy.
Add an all rights reserved statement for the website Travel & Tour.
The background color of the footer should be #002347. The font color of the links should be white. The font color of the headers should be #ff8e00.
Here’s the ChatGPT output:
<!-- Footer -->
<footer class="text-white" style="background-color: #002347;">
    <div class="container py-4">
        <div class="row">
            <div class="col-md-4 mb-3">
                <h5 style="color: #ff8e00;">Contact Us</h5>
                <p>1234 Street Name, City, Country</p>
                <p>Phone: +123 456 7890</p>
                <p>Email: info@travelandtour.com</p>
            </div>
            <div class="col-md-4 mb-3">
                <h5 style="color: #ff8e00;">Follow Us</h5>
                <a href="https://facebook.com" class="text-white me-2"><i class="fab fa-facebook-f" style="padding: 10px;"></i></a>
                <a href="https://twitter.com" class="text-white me-2"><i class="fab fa-twitter" style="padding: 10px;"></i></a>
                <a href="https://instagram.com" class="text-white me-2"><i class="fab fa-instagram" style="padding: 10px;"></i></a>
                <a href="https://youtube.com" class="text-white"><i class="fab fa-youtube" style="padding: 10px;"></i></a>
            </div>
            <div class="col-md-4 mb-3">
                <h5 style="color: #ff8e00;">Legal</h5>
                <a href="#" class="text-white d-block">Terms of Use</a>
                <a href="#" class="text-white">Privacy Policy</a>
            </div>
        </div>
        <div class="text-center py-3">
            <p>© 2023 Travel & Tour. All Rights Reserved.</p>
        </div>
    </div>
</footer>

<script src="https://kit.fontawesome.com/d900569e00.js" crossorigin="anonymous"></script>
Again, don’t forget to replace the placeholders with your actual data. In our example, ChatGPT used Font Awesome to generate the social media icons. To complete the code, we’ll need to add a Font Awesome kit code and update the placeholders with actual information.
Add the code to your index.html file and save. Then, check the output on your browser.
Our footer should now look like this:
6) Finalize Your Homepage
After working through the previous steps and building each section of your homepage, it's time to finalize your design.
Go through the content and layout. Check for consistency in font styles, color schemes, and imagery.
Don’t forget to check for any grammatical errors or awkward phrasing.
Remember that you can also add more sections or pages to your website as you see fit. However, getting the perfect results might take a few tries, and that's completely normal. The key is to refine your prompts, adding as much detail as needed, to guide ChatGPT towards the exact output you're looking for.
7) Test Your Website
The next step before getting your website live is to check the functionality of every element on your page.
Make sure that the navigation is intuitive. All the links and images should be working and loading correctly.
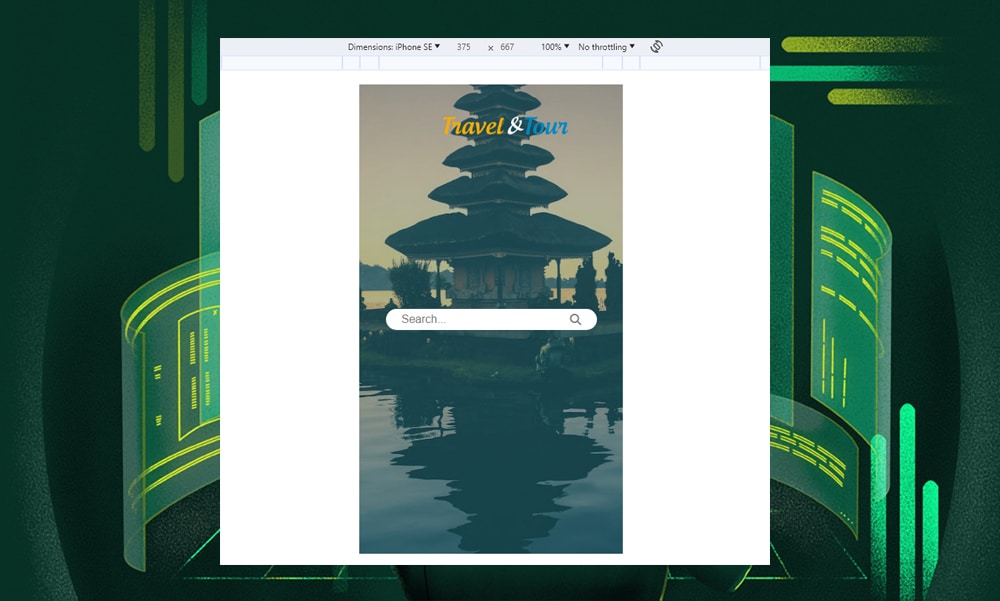
Check the responsiveness of your page. Your site needs to look good on everything from a desktop monitor to a small smartphone screen. Resize your browser window to test different screen sizes or use tools that simulate various devices.
8) Launch Your Website
Finally, it's time to bring your website to life by selecting a web hosting service. There are several options out there, including Cloudways, Bluehost, and Hostinger. Pick one that suits your budget and requirements.
Once you've got your hosting account set up (and your domain name sorted), the next move is to upload your index.html file to the server. For instance, if you're using Hostinger, here's how you'd go about it.
After uploading, take a moment to view your website from the front-end. And there you have it - your website is now live and ready for the world to see!
What ChatGPT Can and Can’t Do
ChatGPT is a powerful tool for generating codes. It offers a helping hand to developers with coding suggestions, concept explanations, and debugging assistance.
However, the platform has a lot of limitations.
For instance, we’ve noticed that it can go down the rabbit hole and generate garbage output. It’s not great for producing a complete application. If you’re a newbie with zero coding knowledge, you won’t be able to use ChatGPT effectively.
ChatGPT can only recognize patterns based on the data it was trained on. However, it doesn’t understand the specific requirements or constraints of your project. That is why you might generate a code that looks right but doesn't actually make sense in practice.
So, here’s our verdict. ChatGPT is a valuable assistant only if you know how to build a website and get specific tasks done. It’s also great for building simple projects, like the one we did in this article. But you can’t totally rely on it if you're building a complex website.
Best ChatGPT Alternatives
So, what are the other best alternatives to ChatGPT?
Well, it depends on your project requirements and level of experience.
Are you looking for an easy and quick solution that doesn’t require coding? Are you building a blog, a landing page, or an online store?
Consider exploring these tools:
Use Page Builders With AI
Page builders are essentially drag-and-drop editors that enable anyone, regardless of coding skills, to build a website. With AI, creating websites with these tools has become more accessible and efficient. You can generate content, images, and even code snippets, all within the editor.
The popular options in the market are Wix, Divi, Elementor, Jimdo, Framer, and 10Web. You can even install some of them as plugins in WordPress. This integration creates an ideal environment for both novice and experienced developers.
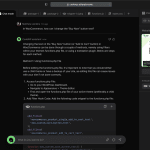
Try CodeWP With WordPress
CodeWP is a great AI assistant specifically trained for WordPress. What's really cool about this platform is how it mimics ChatGPT in simulating intelligent conversation. Simply input what you want to achieve, and it translates the text into functional WordPress code.
It understands languages like PHP, JavaScript, and CSS, and uses this knowledge to help you create accurate, modern, and secure code. This means you can add complex features to your site without using extra plugins, which often cause bloat and slow down page speed.
Using ChatGPT to Build a Website - FAQS
Can I make a website with ChatGPT?
Yes, ChatGPT can assist you in building a website. It can help generate code, provide design suggestions, and guide you through various aspects of web development.
Can ChatGPT write HTML code?
Yes, ChatGPT can write HTML code. It can generate HTML structures based on your prompts and requirements.
Can AI build a website?
Yes, AI can help you build a website. However, it will require your skills and creativity to ensure the website meets specific design and functionality standards.
That’s A Wrap!
ChatGPT is a powerful tool, but it's not perfect. It's designed to complement, not replace, your human skills and creativity.
Therefore, you'll still need to add your expertise to fine-tune and perfect your website. Use ChatGPT for what it does best – giving you a head start, sparking ideas, or speeding up the coding process.
So, keep on experimenting and see what you and ChatGPT can create together.